Catalytic converter cleaner

Disclaimer: Links on this page pointing to Amazon, eBay and other sites may include affiliate code. If you click them and make a purchase, we may earn a small commission.

Motech

Well-known member
Joined
Jun 21, 2021
Messages
494
Reaction score
575
Location
Santa Cruz, CA:
It is the complications with proper exhaust back-pressure and scavenging that make me think that gutting the converter might not serve my purpose. My purpose would be to restore performance to normal and not for any new gains. I'm thinking that my converter is restricted and hurting performance but don't know for sure. The truck only has 46000 miles on it but it was running badly with a dead MAP sensor when I got it and I don't know how long it ran badly and if that could effect the converter.
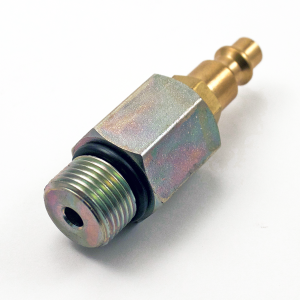
You can test that back pressure before you go cutting and gutting on a whim. Find yourself an 18mm threaded fitting, same as old spark plugs, something you can thread into a hole and then attach a gauge to.

An old 18mm compression tester adapter works real well, like this one, part of a testing kit or cheap by itself at most any auto parts store.
1663794653906.png

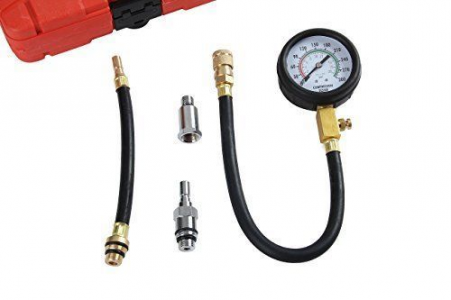
Or even the big-threaded hose of a compression testing set. Just remove the Schroeder valve (just like a tire valve stem) and fit the gauge hose over that instead.
1663795828478.png

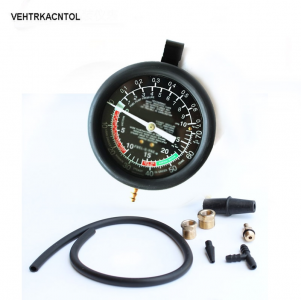
And your basic vacuum testing gauge like this one:

1663794778897.png


Remove oxygen sensor, thread this in it's place and attach gauge to it with a tight fitting hose.

Fire it up, stabilize, then hold it at 2000 RPM and record your pressure. I say zero, industry says 3 psi max.

Then give it a couple of quick but deep Wide Open Throttle snaps to the floor--let that mill spin quickly up to 4000K RM+PM at least--and note your peak pressure. I say 3 psi max, industry says 5-8, but those levels, 5 psi is robbing power you might not notice til you corrected it, but 8 psi is getting your mill into slug range.

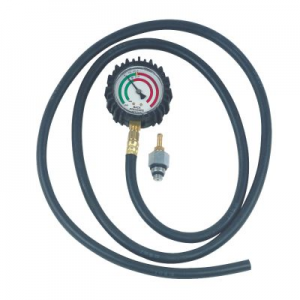
When plugged cats really start to cause power loss grief, pressure will peg these 10-12 psi gauges at WOT snap. That's when engine will be falling on it's face.


(Perfect little homemade example kit)
1663795099312.png
 
Last edited:
OP
OP
mikefamig

mikefamig

Active member
Joined
Sep 3, 2022
Messages
179
Reaction score
146
Location
USA
Perfect thanks! I already have all of these tools in the garage.
 
Last edited:

Motech

Well-known member
Joined
Jun 21, 2021
Messages
494
Reaction score
575
Location
Santa Cruz, CA:
Perfect thanks! I already have all of these tools in the garage.
Excellent!
Fair warning though: if O2 sensor is original, it might resist removal. If it backs out a skoach, then seizes, spray a little penetrant, retighten then back it out a little more. Add more penetrant and continue to "rock" it in and out. It will eventually get easier until it's out, but likely with buggered threads, which means new sensor. They're pretty cheap though, just stick with Bosch or Denso only, and factory connector, not universal splice type.
 
OP
OP
mikefamig

mikefamig

Active member
Joined
Sep 3, 2022
Messages
179
Reaction score
146
Location
USA
Excellent!
Fair warning though: if O2 sensor is original, it might resist removal. If it backs out a skoach, then seizes, spray a little penetrant, retighten then back it out a little more. Add more penetrant and continue to "rock" it in and out. It will eventually get easier until it's out, but likely with buggered threads, which means new sensor. They're pretty cheap though, just stick with Bosch or Denso only, and factory connector, not universal splice type.

Yes and while I have some experience dealing with frozen threads I welcome the advice. I just removed two thermostat cover bolts that broke of in the aluminum intake manifold. I tried heat and PBBlaster and working the thread back and forth but they broke with very little torque. It was lots of heat that finally got the broken studs removed.
 

Motech

Well-known member
Joined
Jun 21, 2021
Messages
494
Reaction score
575
Location
Santa Cruz, CA:
I'd be so peeved with that I'd probably punish my rig by leaving it out in the rain with hood up for a few weeks, the fuckery fully exposed for all the cool, good running cars to see.

Then I'd come back with a new intake setup to make up for the captive humiliation.
 
OP
OP
mikefamig

mikefamig

Active member
Joined
Sep 3, 2022
Messages
179
Reaction score
146
Location
USA
I'd be so peeved with that I'd probably punish my rig by leaving it out in the rain with hood up for a few weeks, the fuckery fully exposed for all the cool, good running cars to see.

Then I'd come back with a new intake setup to make up for the captive humiliation.

That doesn't sound like such a bad idea. Instead I slung my body over the radiator support in 90 degree weather with a torch in one hand and a stud-remover tool in the other. If I had removed the manifold I could have cleaned up the top of the engine and also cleaned up and/or replaced the injectors that I suspect are leaking a little. I'm still hoping that fuel additives will help that.

I like the way you personify your cars but the Bronco is like my dog, you just can't insult her. I scold her and she wags her tail and laughs at me.

Mike.
 

goodO1boydws

Active member
Joined
Apr 22, 2022
Messages
155
Reaction score
141
Location
East Tennessee
Let's see.
1989 Bronco, Eddie Bauer, 351 engine, very low mileage.
Probably the original parts, but you never know.....

Here's an ebay search link.
Lower on the page
it shows several different configuration NOS OEM Ford diverter valves, maybe its got one that matches yours.
If so, you'll have the right part number to look elsewhere, if NOT, you'll know which ones NOT to look for. (The one at the top of the page is showing one for a 3/5.0L fitment in 1989, so it shouldn't look like this.)

 
OP
OP
mikefamig

mikefamig

Active member
Joined
Sep 3, 2022
Messages
179
Reaction score
146
Location
USA
Let's see.
1989 Bronco, Eddie Bauer, 351 engine, very low mileage.
Probably the original parts, but you never know.....

Here's an ebay search link.
Lower on the page
it shows several different configuration NOS OEM Ford diverter valves, maybe its got one that matches yours.
If so, you'll have the right part number to look elsewhere, if NOT, you'll know which ones NOT to look for. (The one at the top of the page is showing one for a 3/5.0L fitment in 1989, so it shouldn't look like this.)


Thanks and yes I've been looking at parts all over the net but I have no idea what the correct part number is or have specs for the part. The part is still on the car which makes it near impossible to identify and I'm not going to remove the part disabling the car because I'm not even sure if it's necessary to replace it at this point. I also doubt that there will be a part number on it that is still readable. Ford tended to put part numbers on paper labels that fall apart.

I'm doing my homework before taking it apart.
 
OP
OP
mikefamig

mikefamig

Active member
Joined
Sep 3, 2022
Messages
179
Reaction score
146
Location
USA
Let's see.
1989 Bronco, Eddie Bauer, 351 engine, very low mileage.
Probably the original parts, but you never know.....

Here's an ebay search link.
Lower on the page
it shows several different configuration NOS OEM Ford diverter valves, maybe its got one that matches yours.
If so, you'll have the right part number to look elsewhere, if NOT, you'll know which ones NOT to look for. (The one at the top of the page is showing one for a 3/5.0L fitment in 1989, so it shouldn't look like this.)


Those are diverter valves and I am looking for a bypass valve.
 

L\Bronco

Well-known member
Joined
Feb 28, 2022
Messages
733
Reaction score
801
Location
A.B. Canada
It is the complications with proper exhaust back-pressure and scavenging that make me think that gutting the converter might not serve my purpose. My purpose would be to restore performance to normal and not for any new gains. I'm thinking that my converter is restricted and hurting performance but don't know for sure. The truck only has 46000 miles on it but it was running badly with a dead MAP sensor when I got it and I don't know how long it ran badly and if that could effect the converter.

To complicate matters further, I tested the bypass valve and the diverter valve with a mighty-vac handheld vacuum tool. The diverter valve held vacuum but the bypass valve leaked down quickly when I applied vacuum to it. What is the point in replacing the converter if the air pump system is not working properly.

I might just replace the Y-pipe and converters if they were available which they are not. I have seen a magnaflow or flowmaster y-pipe which may be my only option short of a custom made exhaust. I need cat-back parts replaced but need to make a decision on the converters before replacing the pipes.

So it seems that the only way to know if gutting my converters is going to improve power would be to do it and see what I get. If they are clogged and I can poke them out then I retain the OEM pipes and keep the system original looking. This Bronco is a real survivor and I'd like to keep the OEM pipes if possible.
Hey Mike, I'm chiming in a little late here, (college is back in session and I'm playing the one legged guy in a butt kicking competition!)
A 100% definitive test for exh restriction is to install a back pressure tester in an Oxygen sensor hole and measure it. Check at idle then 2000RPM, pressure should stay below 1 PSI.
(On most things after 1985 it stays pretty close to zero)
If it does, your exhaust is not restricted
Another easier (Yet less reliable) check is to install a vacuum gauge to a manifold port(vacuum all the time) and run it at idle with ALL loads off, then rev to 2000 RPM and compare the readings. The vacuum should be approx 1"hg higher at 2000 rpm no load. (18"@idle and 19-20@2000rpm)
Again, if it is it is unlikely that you have restricted exhaust.
If the vac decreases at 2000, it could be exhaust or any other thing causing poor engine performance. (That's why the back pressure gauge is desirable)
Hope that helps
Cheers
 
OP
OP
mikefamig

mikefamig

Active member
Joined
Sep 3, 2022
Messages
179
Reaction score
146
Location
USA
Hey Mike, I'm chiming in a little late here, (college is back in session and I'm playing the one legged guy in a butt kicking competition!)
A 100% definitive test for exh restriction is to install a back pressure tester in an Oxygen sensor hole and measure it. Check at idle then 2000RPM, pressure should stay below 1 PSI.
(On most things after 1985 it stays pretty close to zero)
If it does, your exhaust is not restricted
Another easier (Yet less reliable) check is to install a vacuum gauge to a manifold port(vacuum all the time) and run it at idle with ALL loads off, then rev to 2000 RPM and compare the readings. The vacuum should be approx 1"hg higher at 2000 rpm no load. (18"@idle and 19-20@2000rpm)
Again, if it is it is unlikely that you have restricted exhaust.
If the vac decreases at 2000, it could be exhaust or any other thing causing poor engine performance. (That's why the back pressure gauge is desirable)
Hope that helps
Cheers

Yes that is very helpful. Motech clued me in on putting a vacuum/pessure gauge on the O2 sensor port but I haven't tried that yet. I did a quick test with a vacuum gauge on the intake manifold but I just revved it to ~2000 rpm and watched for the vacuum to recover quickly after the initial drop and it looked good to me but I didn't look for 1" vacuum loss. I'll do both the O2 sensor and manifold test again when I get back to it but the Bronco is headed to the transmission shop after a breakdown and I've turned to doing some autumn yard cleanup this week while the weather is nice.

It's good for my head to get away from it a little but I'll keep posted here.
 
OP
OP
mikefamig

mikefamig

Active member
Joined
Sep 3, 2022
Messages
179
Reaction score
146
Location
USA
I'd be so peeved with that I'd probably punish my rig by leaving it out in the rain with hood up for a few weeks, the fuckery fully exposed for all the cool, good running cars to see.

Then I'd come back with a new intake setup to make up for the captive humiliation.
Motech

I just noticed that you live in heaven (Santa Cruz). I had the time and opportunity to drive up the Big Sur coast from LA to San Francisco in the mid 70's in a 1969 Chrysler Newport. I had landed a job in San Francisco as a toolmaker and was making a new life but things didn't go as a I planned and I ended up back in Connecticut where I was born after a beautiful summer in northern CA. I spent a month droving that Chrysler from Connecticut to LA, up the coast to SF and then home and it was an incredible trip but Big Sur is what I remember most. What a trip.

I was completely blown away by the Big Sur coast, the sights are incredible and I've wondered what it must be like to live near there. It was the only time in my life that I stood on solid ground and looked down through clouds to see the ocean. And west coast sunsets are awesome. I guess I left my heart....
 
OP
OP
mikefamig

mikefamig

Active member
Joined
Sep 3, 2022
Messages
179
Reaction score
146
Location
USA
OP
OP
mikefamig

mikefamig

Active member
Joined
Sep 3, 2022
Messages
179
Reaction score
146
Location
USA
Correction, that may not be the part, mine has three ports in it and the part in that link has only two. On the other hand the parts manual from your link shows that the 9b289 part does have three ports. There is still some confusion but that manual is a big help and should get me there eventually.

thanks
 

goodO1boydws

Active member
Joined
Apr 22, 2022
Messages
155
Reaction score
141
Location
East Tennessee
Correction, that may not be the part, mine has three ports in it and the part in that link has only two. On the other hand the parts manual from your link shows that the 9b289 part does have three ports. There is still some confusion but that manual is a big help and should get me there eventually.

thanks
Try looking for it without the "B".
Read on for why.

Some background on FORD part numbers.
Then I'll give you the quickie version.
For a much more detailed explanation there's a link at the bottom to a VERY good article posted on a different Ford site.

The FORD part system you're working in at the moment is good from about 1940 up TO (or through) 1999.
Its used for SERVICE PARTS.
(That's the number used on the part boxes)
I call this the "MAIN" system-because of the following.
--------------------
There is a parallel system used for ENGINEERING part numbers. That's the number on the part itself-which can be a very different number from what's on the box.

There's also a somewhat different system used for common hardware parts.

And yet another one for TOOLS.
------------------
Now, in the MAIN system:
The alphanumeric in front of the first dash , the prefix, is the vehicle identifier.

The first position represents the decade, the second is for the year. (But if the part was unchanged it may very well be the FIRST year it was ever used on a vehicle application.)
Thee third digit is the Model.
The 4th is the specific engineering department or division number.
(if its a Z it just means its a Ford SERVICE PART-non specific)

The second group of alphanumerics is the actual PART NUMBER, the initial digit representing the GENERAL system the part is contained within (brakes/engine/transmission, etc), the rest of that group describe the part precisely.

After the second dash comes the suffix.
This is used to indicate changes to that basic part.

As a rule, a "B" suffix part would be closer to the original part, with either no suffix or an "A" suffix than would an "F" and certainly closer than an "AA" suffix part. (A-Z are used in sequence before moving to 2 characters)
-----------------------------

Here's a great explanation-in detail.

 
Last edited:
OP
OP
mikefamig

mikefamig

Active member
Joined
Sep 3, 2022
Messages
179
Reaction score
146
Location
USA
I'm just realizing how many versions of this valve exist even in the same model year. Talk about a can of worms inside a rabbit hole, I will have to remove the part at some point and see if there is still a part number on it.
 
Last edited:

Motech

Well-known member
Joined
Jun 21, 2021
Messages
494
Reaction score
575
Location
Santa Cruz, CA:
Motech

I just noticed that you live in heaven (Santa Cruz). I had the time and opportunity to drive up the Big Sur coast from LA to San Francisco in the mid 70's in a 1969 Chrysler Newport. I had landed a job in San Francisco as a toolmaker and was making a new life but things didn't go as a I planned and I ended up back in Connecticut where I was born after a beautiful summer in northern CA. I spent a month droving that Chrysler from Connecticut to LA, up the coast to SF and then home and it was an incredible trip but Big Sur is what I remember most. What a trip.

I was completely blown away by the Big Sur coast, the sights are incredible and I've wondered what it must be like to live near there. It was the only time in my life that I stood on solid ground and looked down through clouds to see the ocean. And west coast sunsets are awesome. I guess I left my heart....
Sounds like good memories @mikefamig . Ya, Big Sur is gorgeous for sure! I'm an avid motorcyclist and hit those roads with many others at least once a year, and occasionally solo when my heart can overrule my head for a day.

Santa Cruz itself is pretty enough. It's like, whenever I'm traveling, at the end of my travels I'm excited to get back home. Can't say that about Detroit, where I'm originally from.


But it's all relative. We've got our issues here too, and no industry to speak of, so essentially Santa Cruz is a dead end with a view.
 

Motech

Well-known member
Joined
Jun 21, 2021
Messages
494
Reaction score
575
Location
Santa Cruz, CA:
Most of the engineering and superseded part numbers up there eventually cross to a diverter valve.

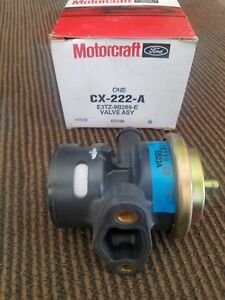
MOTORCRAFT CX222A is the bypass valve.

s-l300.jpg

It bolts directly to pump, so if your hose ****** (EDIT: Really? F L A N G E is a dirty word? Where did you mods grow up?) cannot be swapped over from old valve, then you'd need to mount to pump and get creative with your hoses.

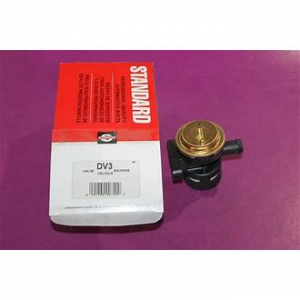
Also crosses to Standard DV3 here on ebay a little cheaper than Motorcraft.

1664380680283.png

I'm going to reiterate - have I steered you wrong yet?

Before buying one, test your system.
  • First make sure all vacuum hoses from manifold to solenoids to valves are impeccable
  • Then run Ford's On-Demand, Engine Running Self-Test.
If you do not get any Thermacter Air Injection codes, you can put this to bed as no problem.
 

Members online

No members online now.

Latest posts

Forum statistics

Threads
22,509
Messages
135,878
Members
25,108
Latest member
Utahstroke
Top