full size Bronco, F-150 Doors

Disclaimer: Links on this page pointing to Amazon, eBay and other sites may include affiliate code. If you click them and make a purchase, we may earn a small commission.

budster 95

New member
Joined
Dec 6, 2010
Messages
118
Reaction score
0
Location
Pocano Mountains, northeast PA
Wondering if 94 F-150 doors with manual window cranks, and manual door locks, have the mounts for my power window, and power door lock set up in my 93 full size Bronco. My uncles F-150 was rear ended, now he is donating some parts to my Bronco project. Anyone ever done this swap? Thanks-Bud

 
Last edited by a moderator:

miesk5

96 Bronco 5.0
Staff member
Moderator
Joined
Oct 18, 2005
Messages
9,071
Reaction score
1,018
Location
Floating in the Pacific
yo BUDSTER,

I am 99.99999% sure that you can swap the doors & convert;

Manual to Electric Swap Info in an 89 (pics are gone)

Source: by 89_outlaw (James);

finally got around to putting in my PDL and PWs today.. here is a lil how to, time spent, problems, what was needed:

Time Spent: 2 hrs

Problems: None, you'll need the plug and play wiring harness for these if not so equiped, mine already had it making the job less time comsuming.

Tools needed: Drill, 3/8 drill bit,small 1/4 dr rachet with 6" extension, assorted small sockets.. depending on whats in your truck. a lil pbs blaster or equivelent to make things go a lil smoother and all the parts needed for the swap

How to: Change from Manual to elec, power windows and door locks

1st off, took off the rotted door and installed the newer manual operated door to the body. less heavy without all the extra stuff. layed the elc windowed door beside the manual

2nd work all the wiring off the elec door

3rd, the lock actuator is pop riveted in if from factory so you'll have to drill this out

4th I went ahead and took the door latch out to save or get rid of and it made more room to move around

5th with a hammer knock in the end of the pop rivets, ya don't have to hit it hard they pop right in then drill out the PR heads

6th take out the 2 screws that hold the vent window on this part of the door and the bolt that was over top the rivets ya just took out.. as you pull out the vent window pull it back towards the back of the door and pull up when it stops turn 90 degrees to get past the attaching tab. the rubber around the window also comes out with this

7th.. once you've got the 4 rivets out becareful becuase the window is going to slide down.. making it easier to get out.. on the window slider simply pull back on the window gear assemble until it slides out of the rail

8th remove big glass.. this should leave your elec door almost stripped.. manuvere the gear assembly and remove from door

thats it.. the door is gutted..

Now do the same to the manual door.. install is reverse what ya just read, clean up and lubricant all parts while out of door makes for a cleaner job

you can use 3/8 bolts and nuts but I was fortunate enough to have a cousin in the glass business who had a Heavy duty rivetor so I reriveted everything that was riveted onto the new door, replace the exterior locks and ya should be in business

keep all the extra parts such as door handles, vent window and so forth, cause ya never know when you'll need em.. or ya can simply sell em or give em away..

Hope this helps someone in need.. thx for looking/reading

James..."

====

Motor Models - the split between models of the 92 (for power window motor purposes) occurs in May. If it was made BEFORE May, the window motor is the same as a 91. Otherwise, the motor is the same as the 92-96.

So, you're ok on that too.

here is a door install by Steve

He swapped a 95 door into his 83; plus, "The body tub is an '82, the tailgate is a '96, the doors are '80 & '94 with '94 power mirrors, the front clip is '84, and the camper shell is a '96 with a '94 Explorer roof rack & '82 sliding windows."

For door alignment, see this:

For more about Doors, see this album:

Parts Diagram

door-details.jpg

Power Window, Power Door Lock, Power Mirror & Speaker Harness & Connector Location & Removal from Door in 92-96; "...The passenger door harness disconnects inside that kick panel. But the driver door harness is continuous from the door lock motor all the way over to those passenger connectors. Either pull the dash, or disconnect everything inside the driver door, and then feed the harness out of it as you remove the door. I'd just unbolt the hinges & hang them both from a beam across the roof of the truck, leaving the wiring connected..."

Source: by Steve83

====

Also;

Doors Removal

Disconnect the battery ground cable (14301).

Remove any door trim necessary to access the electrical connector inside the front door (20124). Refer to Section 01-05.

Disconnect the electrical connector inside the front door and pull the wire harness out of the front door.

NOTE: When marking hinge locations, use a felt marker or equivalent. Do not scratch the paint.

Mark the door hinge locations to aid installation alignment.

Support the front door.

Remove the lower door hinge-to-front door bolts.

Remove the upper door hinge-to-front door bolts.

Remove the front door from the vehicle.

Installation

Support the front door in position at the door hinges.

Align the door hinge-to-front door match marks made at removal and install the upper door hinge-to-front door bolts.

Align the door hinge-to-front door match marks and install the lower door hinge-to-front door bolts.

Align the front door. Refer to Adjustments in this section.

Tighten the door hinge-to-front door bolts to 26-35 Nm (19-26 lb-ft).

Feed the wire harness into the front door and connect the electrical connector.

Install any door trim removed to access the electrical connector.

Connect the battery ground cable.

Front Door, Bronco and F-150, F-250, F-350 and F-Super Duty Chassis Cab

96doorparts.gif

Item Part Number Description

1 22810 Door Hinge, Upper

2 20124 Front Door

3 N803417-S36 Bolt, Door Hinge-to-Front Door

4 22800 Door Hinge, Lower

5 02500 Front Body Pillar

6 N803417-S36 Bolt, Door Hinge-to-Front Body Pillar

A � Tighten to 26-35 Nm

(19-26 Lb-Ft)

-------

96doorglassparts.gif

Item Part Number Description

1 21402 Front Door Vent Window

2 21448 Weatherstrip, Front Door Vent Window

3 21596 Front Door Glass Top Run

4 21410 Front Door Window Glass

5 21458 Front Door Glass Channel and Retainer

6 351909-S ****** Front Door Vent Window Frame-to-Front Door Vent Window Division Bar

7 21452 Front Door Belt Line Outside Weatherstrip

8 21456 Front Door Belt Line Inside Weatherstrip

9 22A00 Front Door Glass Run Latch Side Retainer

10 23240 Window Regulator Arm Roller

11 23200 Front Door Window Regulator

12 23342 Window Regulator Handle

13 23370 Window Regulator Handle Plate

14 23227 Window Regulator Handle Seal

15 22926 Pivot Spring, Front Door Vent Window

16 22963 Pivot Washer, Front Door Vent Window

17 22916 Front Door Vent Window Handle

18 21608 Frame, Front Door Vent Window

19 21408 Weatherstrip Retainer, Front Door Vent Window

20 22296 Division Bar, Front Door Vent Window

21 23208 Front Door Power Window Regulator Minus Motor

22 385189-S Rivet

23 23394 Window Regulator Electric Drive

24 234A24 Window Regulator Drive Gear Kit

---

LUBRICATION

Weatherstrip

Use Silicone Lubricant C0AZ-19553-AA (jelly) and D7AZ-19553-AA (spray) or equivalent meeting Ford specification ESR-M13P4-A on the door and window weatherstrips whenever necessary. Silicone lubricant helps avoid weatherstrip squeaks and retards excess weatherstrip wear from chafing between the door glass upper frame and the weatherstrip. It also helps to retain door window alignment by reducing friction between the glass frame and the rubber weatherstrip.

Hinge, Door and Tailgate

Use Multi-Purpose Grease Spray D7AZ-19584-AA or equivalent meeting Ford specifications ESR-M1C159-A and ESB-M1C106-B to lubricate door and tailgate hinges. Apply an even coat to all hinge pivot points as outlined in the maintenance schedules or when a binding or squeaking condition occurs.


Attachments

  • 96doorglassparts.gif
    96doorglassparts.gif
    14.4 KB · Views: 2
  • 96doorparts.gif
    96doorparts.gif
    13 KB · Views: 1
Last edited by a moderator:
OP
OP
B

budster 95

New member
Joined
Dec 6, 2010
Messages
118
Reaction score
0
Location
Pocano Mountains, northeast PA
yo BUDSTER,

I am 99.99999% sure that you can swap the doors & convert;

Manual to Electric Swap Info in an 89 (pics are gone)

Source: by 89_outlaw (James);

finally got around to putting in my PDL and PWs today.. here is a lil how to, time spent, problems, what was needed:

Time Spent: 2 hrs

Problems: None, you'll need the plug and play wiring harness for these if not so equiped, mine already had it making the job less time comsuming.

Tools needed: Drill, 3/8 drill bit,small 1/4 dr rachet with 6" extension, assorted small sockets.. depending on whats in your truck. a lil pbs blaster or equivelent to make things go a lil smoother and all the parts needed for the swap

How to: Change from Manual to elec, power windows and door locks

1st off, took off the rotted door and installed the newer manual operated door to the body. less heavy without all the extra stuff. layed the elc windowed door beside the manual

2nd work all the wiring off the elec door

3rd, the lock actuator is pop riveted in if from factory so you'll have to drill this out

4th I went ahead and took the door latch out to save or get rid of and it made more room to move around

5th with a hammer knock in the end of the pop rivets, ya don't have to hit it hard they pop right in then drill out the PR heads

6th take out the 2 screws that hold the vent window on this part of the door and the bolt that was over top the rivets ya just took out.. as you pull out the vent window pull it back towards the back of the door and pull up when it stops turn 90 degrees to get past the attaching tab. the rubber around the window also comes out with this

7th.. once you've got the 4 rivets out becareful becuase the window is going to slide down.. making it easier to get out.. on the window slider simply pull back on the window gear assemble until it slides out of the rail

8th remove big glass.. this should leave your elec door almost stripped.. manuvere the gear assembly and remove from door

thats it.. the door is gutted..

Now do the same to the manual door.. install is reverse what ya just read, clean up and lubricant all parts while out of door makes for a cleaner job

you can use 3/8 bolts and nuts but I was fortunate enough to have a cousin in the glass business who had a Heavy duty rivetor so I reriveted everything that was riveted onto the new door, replace the exterior locks and ya should be in business

keep all the extra parts such as door handles, vent window and so forth, cause ya never know when you'll need em.. or ya can simply sell em or give em away..

Hope this helps someone in need.. thx for looking/reading

James..."

====

Motor Models - the split between models of the 92 (for power window motor purposes) occurs in May. If it was made BEFORE May, the window motor is the same as a 91. Otherwise, the motor is the same as the 92-96.

So, you're ok on that too.

here is a door install by Steve

He swapped a 95 door into his 83; plus, "The body tub is an '82, the tailgate is a '96, the doors are '80 & '94 with '94 power mirrors, the front clip is '84, and the camper shell is a '96 with a '94 Explorer roof rack & '82 sliding windows."

For door alignment, see this:

For more about Doors, see this album:

Parts Diagram

door-details.jpg

Power Window, Power Door Lock, Power Mirror & Speaker Harness & Connector Location & Removal from Door in 92-96; "...The passenger door harness disconnects inside that kick panel. But the driver door harness is continuous from the door lock motor all the way over to those passenger connectors. Either pull the dash, or disconnect everything inside the driver door, and then feed the harness out of it as you remove the door. I'd just unbolt the hinges & hang them both from a beam across the roof of the truck, leaving the wiring connected..."

Source: by Steve83

====

Also;

Doors Removal

Disconnect the battery ground cable (14301).

Remove any door trim necessary to access the electrical connector inside the front door (20124). Refer to Section 01-05.

Disconnect the electrical connector inside the front door and pull the wire harness out of the front door.

NOTE: When marking hinge locations, use a felt marker or equivalent. Do not scratch the paint.

Mark the door hinge locations to aid installation alignment.

Support the front door.

Remove the lower door hinge-to-front door bolts.

Remove the upper door hinge-to-front door bolts.

Remove the front door from the vehicle.

Installation

Support the front door in position at the door hinges.

Align the door hinge-to-front door match marks made at removal and install the upper door hinge-to-front door bolts.

Align the door hinge-to-front door match marks and install the lower door hinge-to-front door bolts.

Align the front door. Refer to Adjustments in this section.

Tighten the door hinge-to-front door bolts to 26-35 Nm (19-26 lb-ft).

Feed the wire harness into the front door and connect the electrical connector.

Install any door trim removed to access the electrical connector.

Connect the battery ground cable.

Front Door, Bronco and F-150, F-250, F-350 and F-Super Duty Chassis Cab

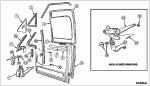
View attachment 11640

Item Part Number Description

1 22810 Door Hinge, Upper

2 20124 Front Door

3 N803417-S36 Bolt, Door Hinge-to-Front Door

4 22800 Door Hinge, Lower

5 02500 Front Body Pillar

6 N803417-S36 Bolt, Door Hinge-to-Front Body Pillar

A � Tighten to 26-35 Nm

(19-26 Lb-Ft)

-------

View attachment 11639

Item Part Number Description

1 21402 Front Door Vent Window

2 21448 Weatherstrip, Front Door Vent Window

3 21596 Front Door Glass Top Run

4 21410 Front Door Window Glass

5 21458 Front Door Glass Channel and Retainer

6 351909-S ****** Front Door Vent Window Frame-to-Front Door Vent Window Division Bar

7 21452 Front Door Belt Line Outside Weatherstrip

8 21456 Front Door Belt Line Inside Weatherstrip

9 22A00 Front Door Glass Run Latch Side Retainer

10 23240 Window Regulator Arm Roller

11 23200 Front Door Window Regulator

12 23342 Window Regulator Handle

13 23370 Window Regulator Handle Plate

14 23227 Window Regulator Handle Seal

15 22926 Pivot Spring, Front Door Vent Window

16 22963 Pivot Washer, Front Door Vent Window

17 22916 Front Door Vent Window Handle

18 21608 Frame, Front Door Vent Window

19 21408 Weatherstrip Retainer, Front Door Vent Window

20 22296 Division Bar, Front Door Vent Window

21 23208 Front Door Power Window Regulator Minus Motor

22 385189-S Rivet

23 23394 Window Regulator Electric Drive

24 234A24 Window Regulator Drive Gear Kit

---

LUBRICATION

Weatherstrip

Use Silicone Lubricant C0AZ-19553-AA (jelly) and D7AZ-19553-AA (spray) or equivalent meeting Ford specification ESR-M13P4-A on the door and window weatherstrips whenever necessary. Silicone lubricant helps avoid weatherstrip squeaks and retards excess weatherstrip wear from chafing between the door glass upper frame and the weatherstrip. It also helps to retain door window alignment by reducing friction between the glass frame and the rubber weatherstrip.

Hinge, Door and Tailgate

Use Multi-Purpose Grease Spray D7AZ-19584-AA or equivalent meeting Ford specifications ESR-M1C159-A and ESB-M1C106-B to lubricate door and tailgate hinges. Apply an even coat to all hinge pivot points as outlined in the maintenance schedules or when a binding or squeaking condition occurs.

Miesk 5, as always you come through with exactly what i need. Thanks so much, your time is appreciated!

 
OP
OP
B

budster 95

New member
Joined
Dec 6, 2010
Messages
118
Reaction score
0
Location
Pocano Mountains, northeast PA
I did the door swap a while back, from an F-150 doner. Didnt get around to posting till now. I only had to drill one hole, that wasnt in the (manual window/door locks) door, for the power door lock solinoid. Worked out great, thanks for the advise. I found a good tailgate this morning, gonna go p/u this afternoon. I also just bought a 1997 Harley Davidson Heritage Softail, and a 1955 2 door Chevy Belair! Sorry to use the "C" word on a Ford forum..........lol I've been very busy! I will post pics later. Thanks again! -Bud

 
Last edited by a moderator:

Members online

Latest posts

Forum statistics

Threads
22,509
Messages
135,879
Members
25,108
Latest member
Utahstroke
Top