Anyone know what these wires hanging from the driver's side dash are for?

Disclaimer: Links on this page pointing to Amazon, eBay and other sites may include affiliate code. If you click them and make a purchase, we may earn a small commission.

JimC25

Member
Joined
May 14, 2020
Messages
33
Reaction score
19
Location
Katy, Texas
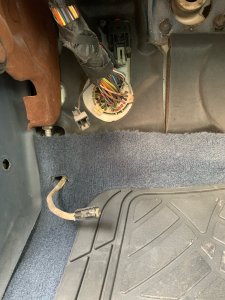
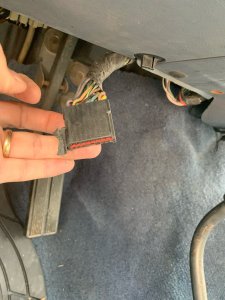
Hello guys, I'm wondering if anyone knows offhand what these wires are for. I'm just about finished getting my '89 XLT (302) sorted out, but don't know what these wires are for. The larger connector in the pic with my hand, fits into a module behind the dash. It had been disconnected until about 5 minutes ago. I connected it and started the engine. The idle was immediately lower, the engine hesitated for a couple of seconds and then smoothed out, much better than it was before I connected it. So far so good, but I would like to know what I actually re-connected.

Also, as far as the two wires in the second pic, I don't see anything that looks like they should be connected to. I plan to just leave them alone for now, but am curious what they are about or if I need to do something with them. Thanks for the help!
 

Attachments

  • Bronco wire 2.jpeg
    Bronco wire 2.jpeg
    2.4 MB · Views: 26
  • Bronco wire 1.jpeg
    Bronco wire 1.jpeg
    1.4 MB · Views: 23

miesk5

96 Bronco 5.0
Staff member
Moderator
Joined
Oct 18, 2005
Messages
9,071
Reaction score
1,018
Location
Floating in the Pacific
Yo Jim,
It's difficult for me to identify the component(s) serviced without wire colors etc.
So, here are the 1989 Ford Bronco EVTM, Emissions (yellowish/red book cover) & Pre-Delivery Manuals, Partial via mrnewland1 in Google Drive @
1989 Service manual - Google Drive
Slow scrolling, so download for faster viewing and to see the table of contents, the search feature, etc.
In EVTM, CONNECTOR Locations
screenshot_20200821-143359-jpg.21989

Screenshot_20200716-114050.jpg

Screenshot_20200811-085433.jpg

Haynes Red Manual 80-95 Bronco & F Series @ 5525384.pdf - Box

1989 Ford Bronco Dealer Brochure

1989 Bronco Lubricant Specifications by Ford via Gary
 

Attachments

  • Screenshot_20200821-143359.jpg
    Screenshot_20200821-143359.jpg
    295.1 KB · Views: 72
OP
OP
J

JimC25

Member
Joined
May 14, 2020
Messages
33
Reaction score
19
Location
Katy, Texas
Thanks Miesk! I Figured out the big connector was for the rear anti-lock brakes. Now that I‘ve connected it, the brake light and anti-lock light are coming on intermittently. I guess that’s why it was disconnected. Lol. Thinking it might be a bad module.
 

miesk5

96 Bronco 5.0
Staff member
Moderator
Joined
Oct 18, 2005
Messages
9,071
Reaction score
1,018
Location
Floating in the Pacific
Yo Jim,
RABS Self Test; except 93-96; "...The 90 service manual gives a routine to pull RABS codes. When the light comes on, don't turn the truck off before reading the codes. Put it in park, chock both front & rear of the wheels, note whether the red brake light is lit also, then momentarily ground the test connector. The test connector comes out of a large loom under the dash, coming through the firewall, near the parking brake. On mine there are 2 similar connectors in that area, the correct one has only 1 black wire with an orange tracer running to it, & was hidden on top of the loom. The correct one is hanging down on the bottom right of the pic below. After you've grounded & ungrounded the wire, the yellow abs light starts to flash. Count the flashes. It said to not count the 1st series, because it may start in the middle. The last flash of the series is a long flash. Then it repeats over & over, until you turn the key off. Count all of the short flashes & the long one together (So 4 short & 1 long is code #5). If I remember right, it should be a number between 2 & 15 or so. If you follow Steve83's sig link, & then go to his Brakes & Hubs album, he has the code definitions for RABS.." READ MUCH MORE; miesk5 Note, Steve83 wrote, The RABS module won't ***** up the speedo or trans the way the 4WABS module can, and even if it goes bad, simply unplugging it removes it from the Gy/Bk circuit.
Source: by ElKabong

RABS Self Test Diagnostic Connector Location pic in an 88; "...it is next to the brake pedal which this is a picture of and is C111; It has the one wire that is black/orange.."
wmrabs-test-connector-for-1988.jpg
Source: by Jem270
 
OP
OP
J

JimC25

Member
Joined
May 14, 2020
Messages
33
Reaction score
19
Location
Katy, Texas
Awesome, thanks! I'll check it next time the light comes on. Funny, the test wire is actually one of the hanging wires I was trying to identify, so the PO must have been working on this too.
 

Glonco

New member
Joined
Dec 17, 2020
Messages
1
Reaction score
1
Location
Anchorage
Thanks Miesk! I Figured out the big connector was for the rear anti-lock brakes. Now that I‘ve connected it, the brake light and anti-lock light are coming on intermittently. I guess that’s why it was disconnected. Lol. Thinking it might be a bad module.
My lights did that too. I found that it was low on brake fluid. Top it off, haven’t been on since.
 
OP
OP
J

JimC25

Member
Joined
May 14, 2020
Messages
33
Reaction score
19
Location
Katy, Texas
Thanks, I checked that early on and it's topped up. I did the RABS Self test and got 3 short flashes and 1 long. When I checked the code for 4, it says that the RABS Valve Switch is closed. I also found some instructions from old posts on testing ohms on different connector pins and this is getting past my knowledge. I'm pretty good with pull and replace but I don't have any equipment for testing the electricals like this. Has anyone else gotten this code and been able to fix it? Half of me thinks I should do what the PO did and disconnect the module and try to pretend I didn't find it in the first place... :) I'm wondering though if all of these components end up affecting other things through the ECM and if I need them hooked up and fixed for things to run right.
 

miesk5

96 Bronco 5.0
Staff member
Moderator
Joined
Oct 18, 2005
Messages
9,071
Reaction score
1,018
Location
Floating in the Pacific
Yo Jim,
RABS Codes 2, 4, 5 & 9 (incomplete) Pin-Point Tests in an 88; & Self Test; Click NEXT to view all pages; miesk5 Note; for all Resistance tests, battery needs to be disconnected; remove Negative cable at battery.
Give it shot, better than nothing
...
&
To check the brake system warning lamp, turn the ignition key to the Start position. The red warning lamp should glow momentarily. The warning lamp will also illuminate if the parking brake mechanism is not fully released. If the warning lamp fails to glow, service of the electrical system is indicated. If the warning lamp illuminates with the ignition key in the Run position, check and repair the conventional brake system as required. If the conventional brake system is found to be operating properly, check the anti-lock brake system for stored codes as outlined under ``Accessing Flashout Codes.'' In certain instances both the red and yellow warning lamps will glow simultaneously. If this occurs, check and repair the conventional brake system as required. If the red warning lamp continues to glow, refer to the ``Warning Lamp Condition Chart,'' Fig. 4, for proper diagnostic and testing procedures, then refer to Tests A through F, as required.
Anti-Lock Brake System (Yellow) Warning Lamp
To check the anti-lock brake system warning lamp, turn the ignition key to the On position. The yellow warning lamp should glow for approximately two seconds and should then shut off. If the warning lamp fails to glow, or glows continuously, refer to the ``Warning Lamp Condition Chart,'' Fig. 4, for proper diagnostic and testing procedures, then refer to Tests A through F, as required. In addition, if the warning lamp continues to glow during vehicle operation, check the anti-lock brake system for stored codes as outlined under ``Accessing Flashout Codes.''
download - 2021-01-27T161904.501.png
 

Attachments

  • Screenshot_20210127-160856_Chrome.jpg
    Screenshot_20210127-160856_Chrome.jpg
    516.4 KB · Views: 12
OP
OP
J

JimC25

Member
Joined
May 14, 2020
Messages
33
Reaction score
19
Location
Katy, Texas
Thanks Miesk. Quick update, picked up a multimeter and checked the resistance tonight. Got reading of 2.10 to 2.15 pretty consistently. Chart says to replace the RABS valve if the resistance is below 10, so I ordered a replacement and plan to put it in this weekend. Hopefully that will fix it. 👍
 
OP
OP
J

JimC25

Member
Joined
May 14, 2020
Messages
33
Reaction score
19
Location
Katy, Texas
Thanks. Got the valve changed and now all fixed. Of course the check engine light came on one day later, so that is the next project. Lol!
 

miesk5

96 Bronco 5.0
Staff member
Moderator
Joined
Oct 18, 2005
Messages
9,071
Reaction score
1,018
Location
Floating in the Pacific
Yo Jim,
Try a Self Test for Diagnostic Trouble Codes by my pal, BroncoJoe19 @ Code Reader.....

PCM stores the Self-Test program in permanent memory. When activated, Self-Test checks the EEC system by testing memory integrity and processing capability, and verifies that various sensors and actuators are connected and operating properly.

Inspect the air cleaner and inlet ducting to throttle body.
Check all engine vacuum hoses for damage, leaks, cracks, blockage, proper routing, etc. Check EEC system including the wiring harness for proper connections, bent or broken pins, corrosion, loose wires, proper routing, etc.
Check the Powertrain Control Module (PCM), sensors and actuators for physical damage, such as IAC, TPS, ICM, MAP,, etc.

Check the engine coolant for proper level and mixture.
Check the transmission fluid and engine oil level and quality. Make all necessary repairs before continuing with SELF TEST.

The engine temperature must be greater than 50° F for the Key On Engine Off (KOEO) Self-Test and greater than 180° F for the Key On Engine Running (KOER) Self-Test. Run it around to heat the engine up and shift thru all gears including Reverse. Make sure A/C is off and transmission is in Park (automatic); or in Neutral for a Manual and; release clutch. Then turn off engine, all accessories/lights (close driver's door) , etc.

Do KOEO test First. Post Code(s) here according to KOEO and KOER.

A helper can assist you by counting the codes. Some use their smart phones to record them.

BEWARE OF FAN, BELTS, PULLEYS, HOT HOSES, IGNITION HIGH TENSION WIRES, AND ENGINE COMPONENTS⚠

Or ask local mom and dad parts stores if they will test it for you.

Or purchase a coder reader such as Equus 3145 Innova OBD I Code Reader for Ford EEC IV Engines at Walmart & most parts stores.
 
OP
OP
J

JimC25

Member
Joined
May 14, 2020
Messages
33
Reaction score
19
Location
Katy, Texas
Thanks Miesk. I ended up getting code 22 for MAP sensor out of range. I replaced the MAP sensor and now all good. I'm getting closer, but it's still going to take a while to get all of the bugs out. Up until about 9 months ago when I bought it, it had been sitting without running for quite a while. This forum and all of the help from you and others has been great!
 

Members online

No members online now.

Latest posts

Forum statistics

Threads
22,509
Messages
135,879
Members
25,108
Latest member
Utahstroke
Top