You are using an out of date browser. It may not display this or other websites correctly.
You should upgrade or use an alternative browser.
You should upgrade or use an alternative browser.
Pinstripe for 94 Eddie Bauer
- Thread starter Big_Rob
- Start date
Disclaimer: Links on this page pointing to Amazon, eBay and other sites may include affiliate code. If you click them and make a purchase, we may earn a small commission.
MarkBright'67
New member
yo Rob,
If Mark's source doesn't have any left in stock (all show discontinued), check out what I dnld'ed a few yrs ago from Ford;
Parts Catalog 92-96 Bronco (Partial) by Ford
https://www.supermotors.net/registry/media/874800
the security certificate is off a bit, Dana is working on it. But it is safe according to Norton & AVG so when I open the files, I select no to the sec warning pop-up.
Stripes w/long Ford part numbers

Select suitable pn such as FOTZ16D170AU Tape, Lower Fender Stripe (Chestnut/ Tan LIsted, Order by Application)
and then copy and paste it into
http://www.partsvoice.com/partsearch
results;
suppliers with 1 out of 1 parts 1
Green Sales (800) 543-4959
CINCINNATI, OH 45237
Updated Jul 04, 2013
Bob Allen Ford 913-381-3000
Overland Park, KS 66212
and
http://www.rearcounter.com
enter pn with NO dashes or spaces
FOTZ-16D170-AU
Availability: 26 found at 1 seller Variations: FOTZ16D170AU, FOTZ*16D170*AU
Green Sales Company
(513) 294-8385
2172 Seymour Avenue
Cincinnati, Ohio 45237
Or find local Automotive Body Shop Supply / Paint Store; they have good sources as well.
One good manufacturer is Cal-Stripes™;; sold in automotive body shops and through distributors
"Please call us at 800-624-4483 if you need help locating a seller near you"
http://www.cowlesproducts.com/calstripes.html
If Mark's source doesn't have any left in stock (all show discontinued), check out what I dnld'ed a few yrs ago from Ford;
Parts Catalog 92-96 Bronco (Partial) by Ford
https://www.supermotors.net/registry/media/874800
the security certificate is off a bit, Dana is working on it. But it is safe according to Norton & AVG so when I open the files, I select no to the sec warning pop-up.
Stripes w/long Ford part numbers

Select suitable pn such as FOTZ16D170AU Tape, Lower Fender Stripe (Chestnut/ Tan LIsted, Order by Application)
and then copy and paste it into
http://www.partsvoice.com/partsearch
results;
suppliers with 1 out of 1 parts 1
Green Sales (800) 543-4959
CINCINNATI, OH 45237
Updated Jul 04, 2013
Bob Allen Ford 913-381-3000
Overland Park, KS 66212
and
http://www.rearcounter.com
enter pn with NO dashes or spaces
FOTZ-16D170-AU
Availability: 26 found at 1 seller Variations: FOTZ16D170AU, FOTZ*16D170*AU
Green Sales Company
(513) 294-8385
2172 Seymour Avenue
Cincinnati, Ohio 45237
Or find local Automotive Body Shop Supply / Paint Store; they have good sources as well.
One good manufacturer is Cal-Stripes™;; sold in automotive body shops and through distributors
"Please call us at 800-624-4483 if you need help locating a seller near you"
http://www.cowlesproducts.com/calstripes.html
Last edited by a moderator:
Big_Rob
Member
Wow.... thanks for the great info!
seems like the bluesprings site has a lot of OE parts that i need....
seems like the bluesprings site has a lot of OE parts that i need....
yo Rob,
Yes that site does have a lot of parts; it is a typical Ford Dealer Parts ordering site; similar to AutoNation Ford White Bear Lake Parts (previously Tousley Ford ) and many others.
Here is what I do to search for parts;
I use http://www.fordparts.com
go thru the drill
If you find the part, copy the Ford long version part number or the short version.. and then do a google, but ensure results apply to your 94 bec same short version pn is a "generic" type # that changes according to year, model, etc.
Ford Part Number Coding Overview (click Articles) 89-98 & 99-26 by Roy B at pera.org
http://www.pera.org/articles/eb90320.htm
Ford Part Number Decoding, Current & Best, by blueovaltrucks.com
http://www.blueovaltrucks.com/tech/FordNumbers.htm
This is for 1996, but applicable:
Body Stripes (Tape) and Vinyl Films
1996 F-150, F-250, F-350, Super Duty and Bronco Workshop Manual
DESCRIPTION AND OPERATION
Body Stripes (Tape)Tape stripes are made from a tough, durable, weather-resistant, solid vinyl film with a pressure-sensitive adhesive back. The pressure-sensitive adhesive back is protected by a paper liner which is easily peeled away during installation. During shipment and storage, the face is protected with an easy-release pre-mask paper
I get many Ford parts via AMAZON; they are VG at delvy and esp pricing; I bought a $150.00 DPFE Sensor (not incl. sales tax) for $50.00 with free shipping and no state sales tax; same for the IAC sensor.
Tape StripingMaterials required:
Installation
Dry Method Installation — Small or Thin Stripes
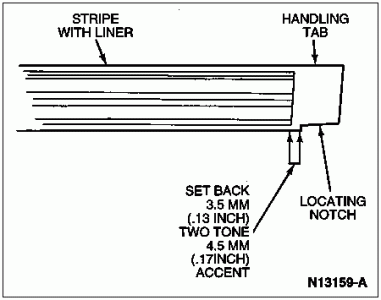
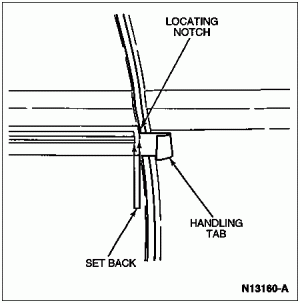
 CAUTION: Handling tabs must be used as illustrated to reduce the possibility of fingers coming in contact with the adhesive side of the tape stripe.

Yes that site does have a lot of parts; it is a typical Ford Dealer Parts ordering site; similar to AutoNation Ford White Bear Lake Parts (previously Tousley Ford ) and many others.
Here is what I do to search for parts;
I use http://www.fordparts.com
go thru the drill
If you find the part, copy the Ford long version part number or the short version.. and then do a google, but ensure results apply to your 94 bec same short version pn is a "generic" type # that changes according to year, model, etc.
Ford Part Number Coding Overview (click Articles) 89-98 & 99-26 by Roy B at pera.org
http://www.pera.org/articles/eb90320.htm
Ford Part Number Decoding, Current & Best, by blueovaltrucks.com
http://www.blueovaltrucks.com/tech/FordNumbers.htm
This is for 1996, but applicable:
Body Stripes (Tape) and Vinyl Films
1996 F-150, F-250, F-350, Super Duty and Bronco Workshop Manual
DESCRIPTION AND OPERATION
Body Stripes (Tape)Tape stripes are made from a tough, durable, weather-resistant, solid vinyl film with a pressure-sensitive adhesive back. The pressure-sensitive adhesive back is protected by a paper liner which is easily peeled away during installation. During shipment and storage, the face is protected with an easy-release pre-mask paper
I get many Ford parts via AMAZON; they are VG at delvy and esp pricing; I bought a $150.00 DPFE Sensor (not incl. sales tax) for $50.00 with free shipping and no state sales tax; same for the IAC sensor.
Tape StripingMaterials required:
- 3M® Woodgrain and Stripe Remover 08907 or equivalent
- 3M® Friction Wheel 07501 or equivalent
- 3M® General Purpose Cleaner 08984 or equivalent
- Silicone and Wax Remover DL60-3271-A or equivalent
- 3M® PA-1 Squeegee or equivalent
- 3M® SA-1 Low Friction Sleeve or equivalent
- KAY 2651 Felt Pad Squeegee or equivalent
- Clean repair surfaces, adjust panels and openings as required.
- Remove any parts mounted on or overlapping tape stripe from affected panel(s).
- NOTE: Removal can be assisted by using 3M® Woodgrain and Stripe Remover 08907 or 3M® Friction Wheel 07501 or equivalents. The use of the friction wheel will also require the use of a Rotunda 3/8-inch Heavy-Duty Air Drill 107-R1616 or equivalent. Avoid using any pointed or sharp tools as they might damage the painted surface.
Remove tape stripe by starting at one edge and carefully peeling it from painted surface. If using Woodgrain and Stripe Remover or Friction Wheel, follow manufacturer's instructions for proper use.
- NOTE: Exercise care when using solvents to avoid possible damage to painted surfaces. To determine if solvent will react with painted surface, test it on a hidden area of the vehicle, such as the underside of the deck lid.
Remove any remaining adhesive from painted surfaces using a cloth saturated with 3M® General Purpose Cleaner 08984 or equivalent. Then remove remaining residue with a clean soft cloth. Repeat as necessary.
- Rinse thoroughly with clean water and/or Silicone and Wax Remover DL60-3271-A or equivalent as necessary.
Installation
Dry Method Installation — Small or Thin Stripes

- NOTE: Freshly painted surfaces must be thoroughly dry. Residual solvents in freshly painted surfaces may cause tape stripe to blister. Fingers should not come in contact with the adhesive side of the tape stripe. The recommended ambient air temperature should be at least 18.3°C (65°F) or above for tape stripe installation to be successful.
Clean all surfaces that will receive the tape stripe with Silicone and Wax Remover DL60-3271-A or equivalent. Wipe surface dry with a clean, dry cloth.
- Position carrier edge or locating notch on tape stripe to body openings and/or character lines on the vehicle. The tape stripe has a setback of 3.5mm (0.13 inch) (two-tone) or 4.5mm (0.17 inch) (accent) on both ends from panel edge. The tape stripe also has a 20-30mm (0.78-1.10 inch) extension on the leading edge of the tape stripe liner to act as handling tabs. The locating notch should be positioned to the panel edge. This will aid in the positioning of the designed setback from the panel edge. Tape stripe DOES NOT wrap around panel edges.
- Partially remove paper liner from the tape stripe to expose approximately one quarter of the adhesive side of the tape stripe to be applied.
- Position the exposed adhesive end of the tape stripe to the vehicle, using the locating notch to assist in correct placement.

- Carefully smooth tape stripe into place with a plastic squeegee, using caution not to allow fingers to contact the adhesive side of the tape stripe. Work from the locating notch back. Remove paper liner to expose additional portions of the adhesive side of the tape stripe as necessary.
- Visually inspect tape stripe periodically for correct placement. When stripe is straight or correctly aligned, finish smoothing tape stripe into place with plastic squeegee.
- Carefully remove the protective pre-mask at approximately a 180-degree angle to the surface. Take care not to lift the tape stripe from its set position.
Re-squeegee the tape stripe to smooth out any air bubbles or irregularities in tape striping, using 3M® PA-1 Squeegee or equivalent, equipped with a 3M® SA-1 Low Friction Sleeve or equivalent to prevent scratching the tape stripe. For contoured surfaces, a KAY 2651 Felt Pad Squeegee or equivalent is recommended for smoothing tape stripes.
Similar threads
- Replies
- 13
- Views
- 3K
- Replies
- 10
- Views
- 1K
- Replies
- 15
- Views
- 3K
Latest posts
-
-
OEM TAKE OFF Ford Bronco 21-25 Front METAL Bumper LED Fogs, Hooks
- Latest: williamoliver
-
-
-

