Yo Doc,
Welcome!
See
Trouble Shooting Power Windows by Seabronc (Fred) RIP friend...
"This applies to the Driver and Passenger side doors
I have a hard time just buying parts to shotgun a problem, you can waste a lot of money that way. However, if you have to, buy the least expensive part. Myself, I prefer to do a little trouble shooting to find the exact cause of the problem.
You could just have a tired motor or a bind, lowering the window is easier than raising it sice you have gravity working for you going down and against you going up.
I would try jumpering the motor direct by disconnecting the plug and putting 12V directly on the pins to the motor, swapping the leads will change the direction of the motor. So if it is up and nothing happens, swap the leads and it should go down. Then swap the leads and see how well it works. If jumpering it direct still exhibits the same symptom, then:
First check for a bind in the track. A worn regulator mechanism often causes the window to bind when going up. It causes the window to shift and try to go up at an angle insted of strait. If that is OK then:
Second remove the motor and check the condition of the
gear. If it looks good, then you probably have a tired motor.
However, if the motor works just fine when jumpering it then you have a wiring problem.
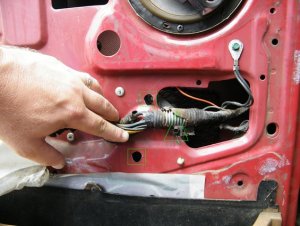
The problem could be the ground path which originates on the driver side and then goes to the passenger side. It goes thru two flex points where the wires transition from the door to the body and back again to the passenger side. Wires in those areas tend to break but they don't break all at once, they go strand by strand which gives a high resistance path for current to flow thru and causes the motor to be sluggish and first noticable in the up direction.
One assumption I have made for the above proceedure is that if the problem is with the Passeger side window and you have the same symptom from either door control. If not, then the +12V path is to that particular window is suspect. The 12 volts comes thru two different paths, one for the driver side control and one for the passenger side control. The flexing wire problem is the same in that the wire breaks strand by strand."
Fred mentioned the
gear also described as motor torque pins in
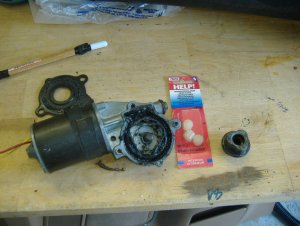
Motor Removal & Repair in an 89
Source: by Brahma502

"Symptom: Motor sure sounds like it's working, window goes nowhere. Solution: little pastic bushings - $10.00
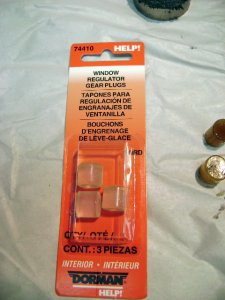
miesk5 note, Motor Torque Pin (also called Bushing) Info & pic; "...Dorman HELP part number 74410..."
There is really only three things to the motor - the motor, the gear and the cog and three plastic bushings that like to break up into 1000s of little pieces inside over time. I thought the motor was off track, but I took it out, held gear with plyers while in operation, and I could stop the gear from turning. The bushings make it go. Don't spend the $60 for a new motor if it's still running.
Take the motor out..... Pull the door skin off and you'll see a nice size hole in the sheet metal. Inside the hole, you'll partly see the motor and the three bolts that hold it in. I've read some guy in Superford that said to grind out the rivets of the window track to remove the motor. Holy shit don't do that. Look at the next page....

Look on the sheet metal directly in front of the 2 out of 3 bolts that are hidden behind. See them little indents in the metal? Take a drill to them, make it big enough to fit a 8 mil socket thru. You can see the two drilled holes pic with the green boxes. The green triangle is the third bolt, which you can actually see in the pic. It's right there, but you have to shave a bit off that edge in order to get a socket and extension in there. I used a round file and filed it down a bit.
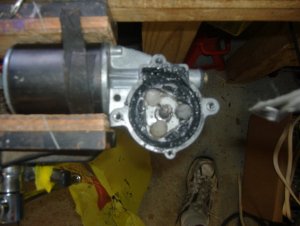
Take motor out and remove the last phillips ***** and the black cover. Remove the center piece - the cog that turns against the window regulator (the triangular circle on the right in the pic on the previous page). Clean out all of the little plastic pieces and throw a bit of new grease in there. Go to the local auto store and get the plastic bushings. I got them in the HELP section of the store...you know, all those red boxes with things you thought you'd never need.
miesk5 note; Dorman HELP 74410;


When you removed the broken bushings, you probably removed a lot of grease also. It was then the triangle inside was uncovered. Put the new bushings in the corners and put the cog back in. But it's not nice and easy. The pressure from the bushings make the cog turn,so it's a tight fit. I put a LITTLE bit of grease on the underside of the cog, in the indents. Put it in place and give it a good shove with your fingers to wedge it in there. Then I took a hammer and GENTLY beat it into submission. Put the cover back on and put the motor back in, which is fun. Hint: get your fingers behind the sheet metal to try and hold the three bolts as they go in, else get one of those long flexable lines with the magnet on the end. (or a wife with long, skinny arms) as the bolts are sure to fall down inside the bottom of the door...or is that just my luck?"
A TIP, "Sorry I didn't get a pic of this, my hands were covered in grease, but I did it by putting the pins only part way in where they are suppost to go and angled them out. Then pushed the metal gear down directly in the middle. Kinda like closing an upside-down umbrella. Having everything covered with grease held the pins up while doing this." by adrianspeeder


