Power Mirrors and Power Door Locks 96 EB Bronco

Disclaimer: Links on this page pointing to Amazon, eBay and other sites may include affiliate code. If you click them and make a purchase, we may earn a small commission.

96FORDBRONCOEB

New member
Joined
Aug 28, 2012
Messages
8
Reaction score
0
I have a 1996 Eddie Bauer bronco that I can't figure out the following problems.

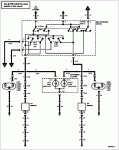
1. Power Door Locks - Do not work

2. Power Mirrors - Do not work

I have looked over the diagram for the wiring for both. The power windows on both side door panels work without any problems.

Locks - When you press unlock or lock from the door panels you can hear them click but nothing is moving at all

Mirrors - These mirrors have the red turn signal on them. And they are working fine. But the power mirrors to move them neither side works.

There is a possible fuse in the Hanyes Bronco manual (page 12-28 Chassis Electrical System/Rear Components and Accessories) that looks like an inline fuse (10A Fuse) from the Electric Motor Switch from the Mirrors and the door locks that is in a red wire that I think might be the problem. But I cannot find it anywhere.

Any help would be greatly appreciated.

Thanks


Rons beast

Active member
Joined
Dec 13, 2007
Messages
1,537
Reaction score
13
Location
Florida..in my mind , sitting on the beach
Welcome 96,

I don't think the mirrors are stock equipment. Fuse # 8 should be powering the mirrors. I don't recall the factory using any inline fuses.

The door lock problem is probably the lock solenoids. I had the same problem, had to replace both solenoids.

Good luck


miesk5

96 Bronco 5.0
Staff member
Moderator
Joined
Oct 18, 2005
Messages
9,071
Reaction score
1,019
Location
Floating in the Pacific
yo,

fuse box Diagram in a 96

fuseboxdashboard.jpg

Source: by Roadkill (The Beast)

4 - keyless entry

6 - A/C Clutch, Diesel Aux. Fuel Selector a, Remote Keyless Entry

8 - outside mirrors, Speedometer (PSOM), etc. ARE Speedometer (PSOM) window COURTESY lamps and key left in ignition, etc. warning chime and other components on this fuse working?

if so, troubleshoot mirror ckt

12 CB - PDL, Tailgate window, etc. is TG window and other components on this fuse working?

if so, troubleshoot PDL ckt

Power Door Lock;

PDL Wiring Diagram With Out Remote Keyless Entry (RKE) in a 96

96-bronco-evtm--pg.-1101.jpg

Source: by Mikey350

Wiring Diagrams With Remote Keyless Entry (RKE) in a 96

=========

Mirror;

Signal mirrors (as equipped by Ford) display a supplemental turn signal through the outside rearview mirror glass surface. The signal is directed toward vehicles in adjacent traffic lanes and is not visible to the driver of the equipped vehicle.

The signal mirrors are equipped with an integrated light sensor and automatically adjust the brightness of the signal display for day and night operation. The signal is connected directly to the turn signal wiring.

Outside Rearview Mirror, Turn Signal Display, Wiring Diagram in a 96

96OutsideRearviewMirrorTurn SignalDisplay.gif

Power Mirror Switch

96PowerMirrorSwitch.gif

Pin Number Circuit Circuit Function

1 54 (LG/Y) Interior Lamp Switch Feed

2 � Not Used

3 541 (DB) Mirror Up/Down Motor

(B+ = Up) (LH)

4 540 ® Mirror Left/Right Motor

(B+ = Right) (LH)

5 57 (BK) Ground Circuit

6 542 (Y) Remote Mirror Solenoid Control (LH)

7 544 (P) Mirror Up/Down Motor

(B+ = Up) (RH)

8 543 (DG) Mirror Left/Right Motor

(B+ = Right) (RH)

PINPOINT TEST A: BOTH RH AND LH MIRRORS INOPERATIVE

A1 FUSE CHECK

Check fuse in panel.

Is fuse in panel OK?

Yes REMOVE outside rear view mirror control. CHECK for power across Circuit 54 (LG/Y). REPLACE outside rear view mirror control. GO to A2.

No REPLACE fuse.

A2 CONTINUITY CHECK

Check continuity in wire harness circuits.

Is continuity OK?

Yes REMOVE front door trim panel. CHECK harness connector to outside rear view mirror. REPLACE outside rear view mirror.

No CHECK continuity of circuits. TRACE continuity to connector. REPLACE mirror. GO to A3.

A3 CIRCUIT LOGIC CHECK

Check circuit logic at outside mirror control wiring connector.

Is circuit logic at harness connector to outside rear view mirror with outside rear view mirror control operating OK?

Yes REPLACE outside rear view mirror.

No CHECK circuit continuity in outside mirror control wiring to outside rear view mirror with outside rear view mirror control operational. CHECK connector. TRACE along outside mirror control wiring to determine cross circuitry location and connect.

96Power Mirror Motor Connector with Turn Signal, LH, Bronco.gif

Pin Number Circuit Circuit Function

1 � Not Used

2 � Not Used

3 541 (DB) LH Mirror Up/Down Motor

(B+ = Up)

4 540 ® LH MIrror Left/Right Motor

(B+ = Right)

5 � Not Used

6 3 (LG/W) LH Front Turn Signal Lamp

7 542 (Y) LH Remote Mirror Solenoid Control

8 57 (BK) Ground

Power Mirror Motor Connector with Turn Signal, RH, Bronco

96Power Mirror Motor Connector with Turn Signal, RH, Bronco.gif

Pin Number Circuit Circuit Function

1 � Not Used

2 � Not Used

3 544 (P) RH Mirror Up/Down Motor

(B+ = Up)

4 543 (DG) RH Mirror Left/Right Motor

(B+ = Right)

5 � Not Used

6 2 (W/LB) RH Front Turn Signal Lamp

7 542 (Y) LH Remote Mirror Solenoid Control

8 57 (BK) Ground

==\\

BTW, here is the 96 Bronco Brochure

see Page 7 for Std Packages & Otion; Signal Mirrors are in Exterior Sport Package & as Options in XLT & Eddie B models


Attachments

  • 96OutsideRearviewMirrorTurn SignalDisplay.gif
    96OutsideRearviewMirrorTurn SignalDisplay.gif
    17.7 KB · Views: 7
  • 96PowerMirrorSwitch.gif
    96PowerMirrorSwitch.gif
    4.8 KB · Views: 11
  • 96Power Mirror Motor Connector with Turn Signal, LH, Bronco.gif
    96Power Mirror Motor Connector with Turn Signal, LH, Bronco.gif
    4.7 KB · Views: 8
  • 96Power Mirror Motor Connector with Turn Signal, RH, Bronco.gif
    96Power Mirror Motor Connector with Turn Signal, RH, Bronco.gif
    4.7 KB · Views: 7
Last edited by a moderator:

miesk5

96 Bronco 5.0
Staff member
Moderator
Joined
Oct 18, 2005
Messages
9,071
Reaction score
1,019
Location
Floating in the Pacific
yo, I had to post up because my CC conn slowed to a dead stop

PDL Pinpoint Tests

CAUTION: Do not replace parts unless test results say they should be replaced.

NOTE: Keep the front door window glass (21410) rolled down during all pinpoint tests to avoid being locked out of the vehicle.

Before proceeding with diagnosis and service of the remote entry electrical operation, check for mechanical binds in the power door lock actuators (218A42). Operate all power door lock actuators several times and check power door lock actuators operation. Also be sure the battery is fully charged.

NOTE: To lubricate linkage, use Multi-Purpose Grease Spray D7AZ-19584-AA or equivalent meeting Ford specifications ESR-M1C159-A and ESB-M1C106-B.

Spray into latch opening

It may be necessary to remove the door trim panel to lubricate the entire latch and linkage system.

Manually cycle the lock ten times

Check for interference around right latch and all linkages.

Check that battery is fully charged (if not, it may be causing the concern).

PINPOINT TEST A: QUICK TEST

A1 OPERATE LOCKS FROM DOOR SWITCHES

For the door lock switch in each front door:

LOCK and UNLOCK the doors several times using the door lock switch. Check that all the doors lock/unlock properly.

Do all doors lock/unlock properly from each door lock switch?

Yes GO to A2.

No GO to None of the door locks work, C1.

None of the door locks work C1

Check fuse No. 6 and fuse No. 8.

Are fuses OK?

Yes GO to C2.

NO REPLACE fuse. REPEAT Pinpoint Test A.

C2 POWER TO MODULE

Disconnect module Connectors C1, C2 and C3 from remote entry module.

Check voltage between Pin 14 Circuit 171 (BK/W) and Pin 25 Circuit 171 (BK/W) of Connector C2 and ground.

Check voltage between Pin 1 Circuit 54 (LG/Y) of Connector C1 and ground.

Are 10 or more volts available?

Yes GO to C3.

No SERVICE open in Circuit 171 (BK/W) or 54 (LG/Y) or CHARGE battery. REPEAT Pinpoint Test A.

C3 CHECK MODULE GROUNDS

Disconnect remote entry module Connectors C3 and C1.

Check continuity between Pin 1 Circuit 57 (BK) and Pin 15 Circuit 57 (BK) of Connector C3 and a known good ground.

Check continuity between Pin 5 Circuit 875 (BK/LB) of Connector C1 and a known good ground.

Is there continuity?

Yes GO to C4.

No SERVICE open in Circuit 57 (BK) of connector

C4 DOES FUSE OPEN WHEN SWITCH IS ACTIVATED?

Reconnect remote entry module Connectors C3 and C1.

Activate the lock and unlock switches.

Check fuse 19 in the power distribution box.

Is fuse blown?

Yes CHECK for short to ground in Circuits 163 (R/O), 118 (PK/O) and 117 (PK/BK) or shorted lock actuator. SERVICE, then REPLACE fuse. REPEAT Pinpoint Test A.

No GO to C5.

C5 CHECK LOCK ACTUATORS

Manually lock all doors.

Connect a jumper wire between a known good ground and Pin 2 Circuit 117 (PK/BK) of Connector C3 with Connector C3 disconnected from the remote entry module.

With a second jumper wire, momentarily connect together Pin 14 Circuit 171 (BK/W) and Pin 25 Circuit 171 (BK/W) of Connector C2. (Only passenger doors should unlock.)

Momentarily jumper together Pin 14 Circuit 171 (BK/W), Pin 25 Circuit 171 (BK/W) of Connector C2 and Pin 3 Circuit 117 (PK/BK) of Connector C3. (Driver's door should now unlock.)

Do all doors unlock?

Yes GO to C6.

No SERVICE Circuit 117 (PK/BK) or Circuit 118 (PK/O) Connector C3 or passenger lock motor(s) or Circuit 163 (R/O) or Circuit 117 (PK/BK) Connector C3 or driver's lock motor, Connector C3. REPEAT Pinpoint Test A.

C6 CHECK DOOR LOCK SWITCHES

Check for door lock switch stuck in LOCK or UNLOCK position.

NOTE: May be mechanically stuck, check door lock switch using meter.

Does door lock switch work?

Yes GO to C7.

No REPLACE door lock switch. REPEAT Pinpoint Test A.

C7 SHORT BETWEEN LOCK AND UNLOCK CIRCUITS

Disconnect remote entry module Connector C3.

Check for continuity between Pin 4 Circuit 119 (PK/Y) and Pin 5 Circuit 120 (PK/LG) of Connector C3.

Is there continuity?

Yes GO to C8.

No SERVICE open between Circuits 119 (PK/Y) and 120 (PK/LG). REPEAT Pinpoint Test A.

C8 CHECK LOCK SWITCHES FOR SHORT TO GROUND

Disconnect remote entry module Connector C3.

Check for short between Pin 4 Circuit 119 (PK/Y) and ground.

Check for short between Pin 5 Circuit 120 (PK/LG) and ground.

Is a short discovered?

Yes SERVICE short to ground in Circuit 119 (PK/Y) or Circuit 120 (PK/LG). REPEAT Pinpoint Test A.

No REPLACE remote entry module. REPEAT Pinpoint Test A. GO to C9.

C9 ONE OR MORE LOCKS DO NOT WORK

Manually cycle the suspect lock(s) several times to check for door latch or linkage binding.

Does latch or linkage bind?

Yes LUBRICATE lock and linkage.

No GO to C10.

C10 CHECK VOLTAGE TO ACTUATOR/DOOR LOCK SWITCH

Remove door trim panel from door with suspect actuator.

Check voltage between the suspect lock actuator and ground while operating power door lock switch.

Is voltage 10 volts or greater?

Yes GO to C12

No GO to C11.

C11 CHECK MODULE OUTPUT

With all connectors in place, depress lock button and measure voltage at Pin 2 Circuit 117 (PK/BK) and Pin 16 Circuit 117 (PK/BK) of Connector C3 to ground.

Measure voltage at Pin 3 Circuit 163 (R/O), Pin 6 Circuit 118 (PK/O) and Pin 18 Circuit 118 (PK/O) of Connector C3 to ground while door lock switch is depressed.

Is reading 10 volts or more with lock button depressed?

YesSERVICE Circuit 163 (R/O), Circuit 117 (PK/BK), Circuit 118 (PK/O), Circuit 119 (PK/Y) or Circuit 120 (PK/LG) for open or short. REPEAT Pinpoint Test A.

No REPLACE remote entry module. GO to C13.

C12 POWER TO ACTUATOR WITH DOOR LOCK SWITCH IN UNLOCK

Check voltage between suspect lock actuator Circuit 118 (PK/O) and ground while pressing UNLOCK position on door lock switch.

Is voltage 10 volts or more?

Yes REPLACE suspect door lock actuator. REPEAT Pinpoint Test A.

No SERVICE open or short in Circuit 120 (PK/LG), Circuit 119 (PK/Y), Circuit 118 (PK/O) or Circuit 117 (PK/BK). REPEAT Pinpoint Test A.

C13 ONE OR MORE SWITCHES DO NOT WORK

Key OFF.

Disconnect module Connector C3.

Remove door trim panel of door with suspect switch.

Check continuity between Pin 4 Circuit 119 (PK/Y) of Connector C3 and lock position terminal of door lock switch (locking Circuit 119 [PK/Y]).

Check continuity between Pin 5 Circuit 120 (PK/LG) of Connector C3 and unlock position terminal of door lock switch (unlocking Circuit 120 [PK/LG]).

Is there continuity?

Yes REPLACE door lock switch. REPEAT Pinpoint Test A.

No SERVICE open in Circuit 119 (PK/Y) or Circuit 120 (PK/LG). GO to C14.

C14 CHECK GROUND CIRCUIT

Check Circuit 57 (BK) for open.

Is circuit OK?

YesGO to C15.

No REPAIR open in Circuit 57 (BK). REPEAT Pinpoint Test A.

 
OP
OP
9

96FORDBRONCOEB

New member
Joined
Aug 28, 2012
Messages
8
Reaction score
0
miesk5,

Thank you for all the information. I will try to give this a try this weekend and give an update after.

Thanks again!


Members online

No members online now.

Forum statistics

Threads
22,521
Messages
135,987
Members
25,129
Latest member
Boone_23
Top