Bronco Not Starting (Firing)

Disclaimer: Links on this page pointing to Amazon, eBay and other sites may include affiliate code. If you click them and make a purchase, we may earn a small commission.

Motech

Well-known member
Joined
Jun 21, 2021
Messages
494
Reaction score
576
Location
Santa Cruz, CA:
I'm going to stray with convention and say this, if it's not too late.

While the old chain and gears are still on there, line up the camshaft so that's perfectly up and down. Then remove your assemblies, turn the crank a little bit that it needs to realign with the cam and install your new parts.

It's a lot easier to tweak the crankshaft back into place that it is the camshaft.
 

Tiha

Well-known member
Staff member
Moderator
Joined
Jul 22, 2020
Messages
986
Reaction score
1,022
Location
Midwest
I'm going to stray with convention and say this, if it's not too late.

While the old chain and gears are still on there, line up the camshaft so that's perfectly up and down. Then remove your assemblies, turn the crank a little bit that it needs to realign with the cam and install your new parts.

It's a lot easier to tweak the crankshaft back into place that it is the camshaft.
That is a good point and very true.

It is easier to roll the crankshaft around where you need it rather than the camshaft. Lifters and rocker arms tend to make it more difficult to turn the cam.
 

goodO1boydws

Active member
Joined
Apr 22, 2022
Messages
155
Reaction score
141
Location
East Tennessee
You may need to loosen the oil pan to get the front cover on. Removing the oil pan enough to change its gasket(s) is best.

IF THERE IS ANY DOUBT ABOUT THE CONDITION OF THE ENGINE, REMOVE THE OIL PAN. Yours almost certainly has shreds/chunks of the cam gear in it, along with who knows what else. (Plus with the oil pan off it doesn't matter if you drop the oil pump drive shaft if you want to re-index the distributor, or take it out for inspection or replacement.)

FOR FUTURE REFERENCE, there's an old method of removing and replacing the front cover on many (not all) older V-8 engines without emoving or loosening the oil pan. It takes a little extra care to keep from damaging the crank seal, but it can save time and mess. Obviously this should only be done with a relatively clean engine-and not on one where you suspect mechanical damage.

First, remove the front engine cover removing ONLY any of the oil pan bolts that are threaded into it.
Next, remove ONLY the exposed part of the oil pan gasket-where it contacts the bottom of the front cover. Try to get a flush cut at the front edge. Determine what material the old gasket is and if possible get the same material/type replacement gasket if you can. (This usually isn't critical-unless there is a special aftermarket oil pan gasket installed-such as an extra thick rubber one. The thought is to end up with something that, when installed, is approximately the same thickness as the rest of the gasket. )
Cut the new gasket to replace the part of the old gasket you removed.
Attach the NEW piece to the oil pan, being certain that it will stay in place while the front cover is being positioned and bolted in place. The important thing here is to remember to put a small amount of silicone or other resiliant sealer at the point where the 2 pieces of oil pan gasket meet-as that is never a perfect match.
Since you're installing a new crank seal there's no sense in damaging it. Protect the seal with a THIN piece of plastic, such as a SMOOTH cylinder cut from a 2 liter soda bottle, and then trim it to the diameter of the crank. Smooth the cut edges so they aren't sharp.This it will keep the seal from directly contacting any roughness or surface defects on the snout of the crank.
Because the oil pan is still in place, it will be a little trickier getting the front cover into position, and may take angling the cover and lifting it slightly upwards, so having the seal protected is important.
 

L\Bronco

Well-known member
Joined
Feb 28, 2022
Messages
742
Reaction score
807
Location
A.B. Canada
I agree with good01boydws, I would pull the pan and clean it out. Its a bit tricky, but do-able. I would change the rear main seal while the pan is off too, careful though this is a slippery slope to a new engine.
That being said, I think you said it was a 351M\400 correct? Those had a rope style rear main seal from factory and you'll be pretty upset if it blows a short while after you have the pan off! The replacement will be a 2 piece neoprene style, and you just knock the lock pin out of the main cap and roll the new seal in.
Just my 2 cents
Cheers
 

johnnyreb

Well-known member
Joined
Feb 23, 2021
Messages
2,423
Reaction score
1,069
Location
West Virginia
I agree with good01boydws, I would pull the pan and clean it out. Its a bit tricky, but do-able. I would change the rear main seal while the pan is off too, careful though this is a slippery slope to a new engine.
That being said, I think you said it was a 351M\400 correct? Those had a rope style rear main seal from factory and you'll be pretty upset if it blows a short while after you have the pan off! The replacement will be a 2 piece neoprene style, and you just knock the lock pin out of the main cap and roll the new seal in.
Just my 2 cents
Cheers
The neoprene ones are alot easier to install. I tried putting the rope in and pulled so hard--even oiled it--I thought my eyes were gonna pop out. Like Lbronc said . Neoprene is the way to go.
 

goodO1boydws

Active member
Joined
Apr 22, 2022
Messages
155
Reaction score
141
Location
East Tennessee
When you filter and clean what's in the oil pan, it would be very wise to check at least several of the bearing and rod caps. (One off at a time.) From the cam gear situation there may be lots of small bits of metal from it circulating-and some of it getting embedded in bearings.

Even if you don't find any embedded metal scarring the journals, it should give you an idea of the overall condition of the journals. (To check clearances you'd need Plastigage.)
 
OP
OP
lucky7_1080

lucky7_1080

New member
Joined
Apr 23, 2022
Messages
28
Reaction score
22
Location
California
Thanks for all the guidance folks. The last post I checked was from March 3rd, so didn't see all of the additional info come through. I've been doing this in my driveway, so due to all the storms we've had here, it's taken some extra time. In short, I got it all back together this afternoon, and got it running again. This was most certainly a timing issue. Here are some notes from the process along the way:

- The 400 timing cover doesn't bolt to the oil pan at the bottom like the 351. You have to drop the pan to get the pan and cover to seat properly. I tried to drop the front half of the pan to sneak it in and it was impossible.

- So, I ended up dropping the pan. I couldn't pull the pan out completely and read elsewhere that you actually have to shim the engine at the motor mounts to pull it all the way out. I didn't want to do that, so managed to clean the block and the plan while it was floating beneath. It sucked but it worked. While I was reattaching the pan, one of the bolts mid-way back on the driver's side snapped. I attempted to extract it while the pan was still on, but it's almost impossible to do without the clearance for a drill head. I've decided to leave it as-is for now. I'll monitor for weeping on that side and if it gets bad, I'll drop the whole pan again. I didn't see the notes on the rear main seal, or inspecting the bearings, etc. in time but visually everything looked fine. There was plenty of nylon in the pan, but no metal that I found. I cleaned it all out. Nothing was stuck to the pump filter.

- Regarding the distributor. Since I could "grab" the oil pump shaft I felt confident I could adjust the distributor so I did pull it up and reset it. It was a tooth off. The prior owner had moved all the plug wires one position to make up for it and get the slack for timing adjustment. I put the plug wires back where they're supposed to be, and confirmed everything was sequenced correctly.

- I ended up installing a new radiator. I left it in for the gear replacement as there is plenty of room (bad move). I must have banged it too hard when I was prying the old gears and chain off, as a small leak developed.

- The thermostat was swapped, but not before one of the stat housing bolts snapped. Luckily, there was enough still sticking out of the block that I was able to extract it. Used PB and double-nutted it out.

- Ended up putting a new harmonic balancer on just so I don't have to deal w/ that in the future. It was $40 so feel like money well spent. The old one was in pretty bad shape.

- I re-painted all my sheaves, they look great.

- Purchased a timing light from harbor freight (without the digital tach) and got everything timed to 6deg. BTDC per the hood sticker. Idles great when warm. :) Drove it around and it now operates like a normal vehicle. Not quite as much power as I'd expect from a 400 (I'm not burning any tires), but imagine some of that is due to carb adjustment.

Now for some new questions:

- Immediately after starting the truck up following the service, I had some coolant drip down and collect on the ground directly below the water pump. My immediate thought was that the supply connection at the pump wasn't tight enough, but it was. It looks like there was a small leak around the bottom of the pump. It was running down and dripping off the bottom front of the timing cover. Everything was torqued to spec (18ft/lbs). I'd say maybe an eighth of a cup collected on the ground, if even that much. Then it just stopped. Drove it around the block, no more leak. Left it parked for a couple hours with a big sheet of cardboard under the truck, no leaks. Is this normal? Is it possible that the cover heated up and the gasket/gasket sealer activated?

- It's clear that the carb and choke need to be adjusted. It doesn't idle / choke properly as its warming up. Does anyone have a good reference for the sequence of operations for "tuning" and adjusting the Motorcraft 2150?

- When I was working on the oil pan, I noticed a big gap at a "secondary" cover plate at the bottom of the bell housing. (I can send photo of this if helpful). This small plate sits over top of the larger bell housing cover (where flywheel is located). Both mounting screws are in place, but one must be stripped as it can't be tightened. Should I be concerned about a gap here?

- I did witness quite a bit of transmission fluid which has collected on the bottom of the tranny pan. Wiped it all off to see how bad it gets after next drive. Going through the transmission may be the next thing to evaluate. (This is a C4, or whatever they called the automatic model below the C6). Thoughts on going through tranny? Ok to drain and flush, or could that create new problems?

Thanks all for the continued help!!!!

L7
 

goodO1boydws

Active member
Joined
Apr 22, 2022
Messages
155
Reaction score
141
Location
East Tennessee
Don't worry too much about that inspection plate.

As long as its in position and fairly snug you should be ok-its not meant to be a hermetic seal, but more of a dust cover-and often has a groove to let fluid drip out if its getting by the seal or if water has gotten in.

If the bolt can't be tightened, carefully try to back it out.
It may not have stripped the hole to its full depth.
People lose those bolts and sometimes put ones back in that may be too short, or not threaded all the way to the head. If its the latter, it CAN'T be tightened all the way down and more elbow grease won't help-but a washer or 2 would. If the bolt is too short and has been tightened too much it WILL strip out that hole. If it IS stripped all the way, you can either put in a smaller diameter bolt "temporarily" and use a nylock nut on the back side, or rethread it for a larger diameter bolt.
If you look inside the the bottom of the bellhousing and see evidence of much fluid passing through or collecting at the bottom INSIDE the bellhousing, that might be why the trans pan is wet.
 

johnnyreb

Well-known member
Joined
Feb 23, 2021
Messages
2,423
Reaction score
1,069
Location
West Virginia
It will still function. The opened up gasket was designed to distribute EGR flow a little more evenly among all eight cylinders.


I want to say don't sweat it, but can't without viewing in hand. Sorry.


Yes. Your power valve is clearly ruptured. That's it right there.

A new float is in order too unless you pulled a brass unit out of it.


Sop it up with stout paper towels and let the residual evaporate (if it hasn't already).


If there's enough broken tube on each end to connect them with some hose, a piece of EGR exhaust pressure sensor hose from a later model engine will do the trick. Look up DPFE hose for, say, a 99 F150 with a 4.6 or 5.4L and grab a few inches of the larger size.
Get a new set of spark plugs. Sounds like you killed the ones you have. Check the gap on them to.
 

Motech

Well-known member
Joined
Jun 21, 2021
Messages
494
Reaction score
576
Location
Santa Cruz, CA:
Is it possible that the cover heated up and the gasket/gasket sealer activated?

Yes, which means it's also likely that it will leak again when it cools down. Go back through everything and retorque all your bolts and hose clamps, then see what comes up.

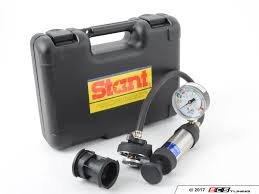
Also, think about investing in a cooling system pressure tester. You can find one like this used pretty easily.

images (4).jpeg

Does anyone have a good reference for the sequence of operations for "tuning" and adjusting the Motorcraft 2150?

Buy a Chilton's manual covering Ford F-Series/Bronco of your model year range. (Not Haynes. They're junk) It will cover all things carburetor, plus anything else you'll ever need to address on your truck.

Thoughts on going through tranny? Ok to drain and flush, or could that create new problems?

Pan gasket seepage is disappointing, but normal. Try cinching bolts back down.
Flush is rare. Commercial machine is necessary. Absolutely no harm in filter replacement with drain and refill. Requires pan removal, a good time to better reseal it.
 

goodO1boydws

Active member
Joined
Apr 22, 2022
Messages
155
Reaction score
141
Location
East Tennessee
Pan gasket seepage is disappointing, but normal. Try cinching bolts back down.
But be careful about OVER torquing the pan bolts.

Many pan leaks start from oil pan gaskets getting compressed so much where the bolts are that the pan lip under the bolt head/washer actually bends, making the locations where the bolts are stick up enough higher that the gasket is loose everywhere else. Once the pan gets the overtorqued treatment, a new standard gasket won't seal properly. (A very thick one or a rubber one might.)
With premium gaskets, the bolts holes tend to be a snug fit for the bolts, (making it easier to start the first few) while economy ones can have much bigger holes. Its easier to deform the pan when tightening the bolts down onto a gasket with the larger bolt holes.
Its simple to check flatness with the pan off and lying upside down on a good flat surface, but if you can only LOWER the pan, a straight edge will work.
 

L\Bronco

Well-known member
Joined
Feb 28, 2022
Messages
742
Reaction score
807
Location
A.B. Canada
- I did witness quite a bit of transmission fluid which has collected on the bottom of the tranny pan. Wiped it all off to see how bad it gets after next drive. Going through the transmission may be the next thing to evaluate. (This is a C4, or whatever they called the automatic model below the C6). Thoughts on going through tranny? Ok to drain and flush, or could that create new problems?
Motech:
Pan gasket seepage is disappointing, but normal. Try cinching bolts back down.
Flush is rare. Commercial machine is necessary. Absolutely no harm in filter replacement with drain and refill. Requires pan removal, a good time to better reseal it.
Your 79 should be a C-6
Motech is absolutely right, no harm in a fluid change. The Torque converter on those actually has a drain plug that is accessed through that inspection cover you were referring to.
drop the pan and clean it out, look for debris. (A Thin coating of dark gray gunk is normal, but shiny metallic or chunks are not. Note your fluid color, it should be red or brownish but not black. It might smell strong, but shouldn't smell burnt. )
The drain in the T\C is a pipe plug with a 7/16" head, just roll the engine over till the drain plug is at the bottom of the inspection hole.
The whole thing holds 12 quarts, (you only get 5 1\2 when you drop the pan.)
Fresh fluid won't aggravate anything, if it fails after service, it was on its way out already.
Hope that helps
Cheers
 

goodO1boydws

Active member
Joined
Apr 22, 2022
Messages
155
Reaction score
141
Location
East Tennessee
Good point about the drain plug on the convertor L\Bronco, many folks forget or don't know that lots of the Ford convertors have them.

Another tip.
Just in case there's no magnet INSIDE the trans pan, you might want to put one or a few STRONG magnets on the outside bottom before you start to drain it, to hold onto some of the iron/steel slurry or bits that are the fluid.
If there's no magnet inside and you dump that fluid fast, much of what's there that's LOOSE will get pushed out and you may never know it was there.
If you're very patient, you can even lower one end/corner of the pan and let it flow out slowly AND FILTER IT through a fine mesh light-colored rag or paper towel-lined funnel. That way you can catch some of the stuff that's NON-magnetic too.
 

Tiha

Well-known member
Staff member
Moderator
Joined
Jul 22, 2020
Messages
986
Reaction score
1,022
Location
Midwest
For the choke adjustment, Hold the pedal down, prop throttle open. With the engine cold, turn the choke housing until the choke butterfly just closes completely.

Then test it. That will be close, if it opens too fast, tighten it some more. Doesn't open fast enough then loosen it a little.
 

L\Bronco

Well-known member
Joined
Feb 28, 2022
Messages
742
Reaction score
807
Location
A.B. Canada
- It's clear that the carb and choke need to be adjusted. It doesn't idle / choke properly as its warming up. Does anyone have a good reference for the sequence of operations for "tuning" and adjusting the Motorcraft 2150?
Tihas method will definitely work.
Question, did you buy a carb kit when you rebuilt it at the beginning of this journey? If you did, the paperwork that came in the kit has all of the instructions for all of the adjustments for your 2150.
If you don't have it, Tihas method is tried and true!

Hope that helps
Cheers
 

Members online

No members online now.

Latest posts

Forum statistics

Threads
22,516
Messages
135,945
Members
25,119
Latest member
Sgariffo
Top