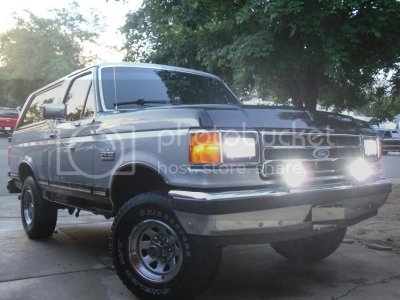
1991- upgrade thoughts

Disclaimer: Links on this page pointing to Amazon, eBay and other sites may include affiliate code. If you click them and make a purchase, we may earn a small commission.

CJGamer

New member
Joined
Nov 18, 2010
Messages
46
Reaction score
1
Hi guys- new to the boards although I've lurked on and off for 4 years or so. First post.

So I've recently decided that rather then buy a new truck- I'm keeping the old beast, and getting it more comfortable.

It's a 1991 Eddie Bauer Blue/tan, with the 302.

I haven't had heat in 3 years, so I just ordered everything from partsgeek to redo that, and I'm also going to drop the transmission pan off, replace all the gaskets, filter, and put in a pan with a drain plug.

The first interior thing is where I'm a bit stumped. Seats. I have the 2 front buckets with the center console. The driver bucket is partially broken, and leans left, which totally sucks. I need to replace it. Honestly- I don't give a rat's ass about the seats matching (tan interior now)- Im more interested in what will be a simple swap. I've read around of guys using F150 or Dodge seats, and before I hit up the junkyards, figured I'd ask you guys. I'm looking for a better bucket with some lateral support- I think these Bronco seats ****, as I drive Euorpean cars as my daily drivers (98 Boxter, 2005 Mini Cooper) and the seat style is Recaro, if you know what I mean. Much more wrap around.

I have a bad back- so this is important. Also- if I'd get a leather seat from a higher end truck that is heated- is that a simple thing to work a switch to, being that this doesn't have heated seats now? I'd love any decent feedback.

Also- the suspension is shot, and I'm looking at redoing it, at a decent price though, not going crazy. If it raises it 1-3 inches, I don't care- I just want a ride that works, as I'd guess it's all original. (170k)

I've priced out Ranch 5000 series shocks, 6 of them, upper and lower ball joints, and a set of rancho coils for the front.

What else would I need? Think I should keep the rear springs as is? Maybe pull them out and grind them a bit to get rid of rust, then add one ad-a-leaf in their for rigidity?

what about stabilizer bars or anything else I'd need to replace? I've never done anything more then a shock replacement myself, so this will be my first bit suspension job. I run 31 inch Kumho MT's (40k miles on them, and they could go another 25) However, I'm not opposed to getting a new set with 33's.

So there I am- thanks guys.

 
OP
OP
C

CJGamer

New member
Joined
Nov 18, 2010
Messages
46
Reaction score
1
and FYI- last year I redid all the brake lines.

The year before I redid the complete exhaust from the Cat Covt. back.

I've also cleaned out the whole air system, and put in a K & N filter, and 2 years ago threw in a can of restore, and it hardly burns oil now.


AdamDude04

New member
Joined
Jan 13, 2009
Messages
828
Reaction score
0
Valve covers.. Easy to due. They have new ones that are rubber and can be re-used. I did mine.. Greatness from cork, as those start to break down over time.

I got monroe reflex shocks..they are amazing. I did an abrasive swerv at about 60mph and there was very little body roll. I didnt think for a second I was out of control.

Rear driveshaft..suppost to be greased. Take the slip yoke out of the driveshaft (connects to axle) and grease it all up. Rear diff is a goof fluid to change. Cost me $25 in oil and an hours time. $5 for the diff cover gasket.

Sea foam. I use this stuff every 3 months. Its amazing stuff.

Tranny change is good. Easy to do, but messy.

I like the idea for the seats. I will have to look into the dodge seats. They are fairly comfortable.

Window seals are good to check. All three outsides for $30. Prevents scratching the glass with sand.

Im getting goodyear duratrac tires. I have bridgestone dulers that I love, but Ive heared nothing but great things about em on the FJ forums..same wheelbase as broncos.

I got HIDs for my headlights.. Makes driving at night so much better. $40 shipped. Had one kit for over two years, no issues. Ddmtuning.com

 
OP
OP
C

CJGamer

New member
Joined
Nov 18, 2010
Messages
46
Reaction score
1
actually, on friday I picked up a set of silverstar replacement bulbs for the lights. HID's are illegal here in PA now. I had thought about tossing in a set of PIAA's though as fog lights, but doubt I'll need them.

I'm going to scrub the lenses with an aluminum wax I have for my motorcycle wheels (BMW GS) and a brillo pad- I've heard that does the trick well.

Great first response though, thank you, that's good stuff.


AdamDude04

New member
Joined
Jan 13, 2009
Messages
828
Reaction score
0
actually, on friday I picked up a set of silverstar replacement bulbs for the lights. HID's are illegal here in PA now. I had thought about tossing in a set of PIAA's though as fog lights, but doubt I'll need them.

I'm going to scrub the lenses with an aluminum wax I have for my motorcycle wheels (BMW GS) and a brillo pad- I've heard that does the trick well.

Great first response though, thank you, that's good stuff.
I wouldnt waste money on silverstars. They are junk. I have had em, they are no where near the commercials. My buddy got em shortly after I got my HIDs. After I turned mine on, you couldnt tell his were on. I know PA has been cracking down on the philly side (used to live in south jersey near philly). If anything they are worth a shot. Just remeber if you do get them, adjust your lights properly. I only have gotten flashed a few times, mostly on big hills. If you do get em, an get the law, you could convert some hella 500s to hids. I did with mine and they much brighter than my buds 100w KC daylighters. I did this mod to prove to him I would get brighter offroads lol

I used mothers aluminum mag polish on my girlfriends headlights. They were yellow crusted over. After two coats with a cotton rag in circle motions, they looked brand new again. Not sure I would use a brillo pad..

Also one thing I did to my fading wiper blade arms, I got a can of bedliner spray and did three coats on each arm. After nearly a year they still look new and give a nice texture. That stuff is great for flat black items that dont need a loot of prep. I did my spare tire bracket too on the tailgate

Im currently looking for a E.B. Bronco bumper. They have two cut outs an each side of the licence plate, perfect for a nice set of fog lights. Im planning on getting that done in a year if I can locate one

Anywho, any more questions, just post!

Bronco2.jpg

 
OP
OP
C

CJGamer

New member
Joined
Nov 18, 2010
Messages
46
Reaction score
1
I put the Silverstars in (already had them) and did the lenses with the wax I had- prolly the same u had, and a few old t-shirts. Worked great- Overall, a huge improvement from where I was before.

You mentioned the window seals- great Idea. I'm going to do that- as my driver motor is basically dead, goes down, doesn't have enough left to push up, without me pushing it up with massive force. So I took the panel off and checked it all out. Lubed the stuff up, now it goes down really welL! but still doesn't have enough to go up. All the wiring looks fine though. So when I order that part, I'll get the window seal stuff also. Since I'll have the door panels off, I mine as well replace the front speakers too.


miesk5

96 Bronco 5.0
Staff member
Moderator
Joined
Oct 18, 2005
Messages
9,072
Reaction score
1,025
Location
Floating in the Pacific
yo,

For the Seats; look in my site @ http://www.broncolinks.com/index.php?index=312 for many Swap Links; such as:

Installation & Mount Mod (PRP Racing) in an 84 Source: by our pal here, justshootme84 (Randy Z, Casual Mudder) at Ford Bronco Zone Forums

"...I have a set of leather buckets out of a Suburban and they seem a bit wider and fairly comfortable. Re-used the floor plate bracket and mounted the seats to a set of flat bars that then bolted to the floor bracket. That was for the powered driver seat, the other 3 new mounting holes in the seat rails and they bolted up to the floor mount bracket..."

Source: by 4drbronko

Installation & mount mod (88 Saab 5000 Turbo) in an 89

Source: by Andrew K (Andy351, das panzer, sloppy seconds, the magic carpet) at http://www.superford.org/registry/vehicles/detail.php?id=2318&s=20469#content

Installation (90's Cherokee) in a 90

Source: by 90Beater (Topher, Chris) at http://bronco.tophersworld.com/writeup_seat2.htm

Installation (Explorer) in a 92; "...all you have to do is remove four bolts to remove the Explorer seats from there frames and bolt onto 92'-95' Bronco seat frames. also, replaced the drivers side reclining latch with the one off my old seats. Purfect fit..."

Source: by GunDude

Installation (F250) in an 85

Source: by Chris B (Blue, bronco boy) at http://chrisb.users.superford.org/Bronco/Projects/Seat_Swap/Seat_Swap.html

many more Swap Links there.

Incl one for the Seat Heater

==============

Suspension:

rear springs:

If the $ is avail consider new springs & especially the shackles/ hangers and/or a shackle flip (to raise rear a bit) since brackets tend to rust, break and pop da spring thru the cargo area floor pan.Such as by our Main Sponsor here @ BZ, Jeff's Bronco Graveyard

1980-96 Rear Spring Hanger # 332621 New 1980-96 Bronco With 3" Wide Springs Price: $33.00


80-96 Rear Spring Shackle Item #33263A - New Our Price: $18.00


&

Item #33250 - New! 1980-96 Bronco and F150 4x44 Pack Leaf Spring Pair 1700lb per spring
7STOCK.JPG


Restore that sagging rear end! No we're not talking about plastic surgery. Brand new leaf springs for your 1980-96 Bronco! 1,700lb weight rating per spring. Will raise Bronco 1"-2" over stock. Best for towing applications

or stock height:

Item #33251 - New!

1980-96 Bronco and F150 4x4

4 Pack Leaf Spring, Pair

1389lb per spring, Restore that sagging rear end! No we're not talking about plastic surgery.

Brand new leaf springs for your 1980-96 Bronco! These will bring the rear of your Bronco back to stock height.

1,389lb weight rating per spring. Our Price: $205.00

Jeff's also carries Superlift leaf springs for other Lift heights @ http://broncograveyard.com/bronco/c-472-leaf-springs-rear.html

& front coils w/var Lift heights @ http://broncograveyard.com/bronco/c-169-coil-springs.html

as well as other Lift parts @ http://broncograveyard.com/bronco/c-172-susp-links.html

----------------

Inspect all steering/suspension bushings such as radius arms, stabilizer(s) etc and replace w/poly (a bit stiffer Euro ride); http://broncograveyard.com/bronco/b-168-bushings-polyurethane.html

I used Daystar because they were @ a good price.

Torsion Bar Bracket # 34574 New 1980-96 Ford Bronco Price: $18.00

===

Head Light Upgrade;

Item #18095 - New

1966-77 Ford Bronco

Proudly Made In The USA!

This is the ultimate duty headlamp harness!

This harness has the capability to run 700 watts!

FEATURES:

It uses a 300 degree wire loom

Will work with H4 headlights,or make your current headlights better! Our Price: $69.00

I believe there is one harness w/proper connectors for our 9007 Bulbs


AdamDude04

New member
Joined
Jan 13, 2009
Messages
828
Reaction score
0
Speakers good too. May require a little modding to fit. I had to drill new holes. I got all alpine speakers an they sound alright. No bass. Probably due to lack of sound proofing in the door. If you can, add some

 
OP
OP
C

CJGamer

New member
Joined
Nov 18, 2010
Messages
46
Reaction score
1
I appreciate the ideas. I picked up the Truck Bed Black stuff- and got nice new wipers while I was at it.

Also- got a can of seafoam, leather steering wheel cover, and a can of primer.

First project up is Fixing the Heater. I have a new heater core, the valve assembly to the heater and a new fluid tank for the coolant and windshield washer fluid, as mine leaks at the half full spot, and is currently held in with a bungie chord, and some zip ties! Yeah. I pulled the glove compartment off, and took off the cover. Doesn't look that bad, but I'm still replacing it. I havn't pulled it yet- because I have yet to drain all the fluid out- as I'm about to be on dad duty for the rest of the day and can't work. The petcock to drain it looks fine- but all the hard lines around the radiator and from the rad to the heater and ac look pretty rusted, although sturdy and I can't feel or see any leaks.

I have to grab a new radi. cap yet, and what do you think about replacing some of the lines? Also- anything else I should replace there still? The ac still works fine, I just have no heat.


AdamDude04

New member
Joined
Jan 13, 2009
Messages
828
Reaction score
0
Replace all you can. Hoses are cheap and better to do now than draining fluid again. No heat sounds like a core or clog. My thermo stuck open and I get ** hot heat. Takes a little to get it but still works.

Sea foam great stuff. If you get a huge smoke show you had a lot of crud. At around 300k with my first foam treatment I had 5 seconds of smoke. Nothing like the YouTube videos!

 
OP
OP
C

CJGamer

New member
Joined
Nov 18, 2010
Messages
46
Reaction score
1
So I replaced both the heater core, and the overflow tank this weekend. Not that bad a job at all. First- I had some fluid leakage over time from the core onto the passenger floor mat- Well, I knew i had some kind of leak- I just didn't realize that's where it was from. Anyway- that should fix that- and Now I have some heat. It's not really hot-but it's better. A hottish warm maybe? But a great start.

So- I've ordered a new thermostat and gasket, new hoses for the radiator lines and hoses to and from the heater core. We'll see if that completes the job. Oh- and after putting the new overflow tank in- I drilled a new mounting hole and mounted it solidly- instead of the zip ties holding the old one up. Sanded down all the rust around that area, primed it also. Big difference, and the wiper motor seems to spit better now that I cleaned that up too. Flushed lots of water through the radiator, until it stopped coming out brown.

I also took advantage of Crutchfields free shipping and a $50 off cyber monday deal on a kenwood Ipod/CD receiver and 4 speakers. So this coming weekend I was planning on pulling off the door skins to do the window seals, and the window regulator/motor on the drivers side- and I'll replace the door speakers at the same time.

Also have a new Radiator cap on the way. Looked underneath at the transmission, and based on the number on the side- and 20 bolt big ass pan, I ordered a new gasket for an E4OD., along with a filter kit.

 
OP
OP
C

CJGamer

New member
Joined
Nov 18, 2010
Messages
46
Reaction score
1
Today I started by putting on a new Radiator cap.

Then- I pulled the windshield wipers off. I then did the Bedliner Black on the wiper arms- and replaced the wipers with those new ones that don't have the 4 metal mounting points. Very sweet. I like the look of the black- great idea, thanks.

Now- inside- Pulled off the drivers side interior door, ripped out the window regulator/motor assembly. Pulled out the speaker. pulled out the window seals. Cut mounting bracket for speaker out of hardboard- mounted and tested speaker, put new regulator and motor together, mounted, then did the window seals. All back together, works great.

Ran to gas station, tossed in that can of Sea Foam, and 27 gallons of petrol- and now she's back in the garage waiting for tommorrow. Very happy with my progress so far.


AdamDude04

New member
Joined
Jan 13, 2009
Messages
828
Reaction score
0
Great! You have done a lot of work it sounds like in the last couple weeks.

The bedliner wiper arms is my favorite. Cheap, and good looking. Glad you liked it too

With the sea foam, you want to add that to your motor via brake booster hose..you can put in gas tank but that's not as good as direct input.

 
OP
OP
C

CJGamer

New member
Joined
Nov 18, 2010
Messages
46
Reaction score
1
Well- as discussed in another thread- stereo is now replaced and working. I used a dremel to cut away a bit of the dash plate to fit back in correctly- but it looks great!

Other items I did this weekend- Replaced the fuel filter with a new motorcraft one- same as what was on there. Simple swap.

Then the biggie- dropped off the transmission pan, replaced the tranmission filter, drained as much fluid as I could, cleaned up the pan, put on a new gasket, new filter, and put the pan back on. Filled it up with fluid- I put in 5 quarts- which means I got about a third of it out. Now- I know that I should probably drain it two more times to get most of the fluid changed, but I'm going to wait, as I have no clue when it was done last. The fluid was black. It runs fine again, although I still have some knocking in the 60-70 mph area, that will hopefully be fixed once I tackle the engine in a few weeks.

Topped back off the antifreeze and washer fluid, and tossed in another quart of oil.

Drove the Beast to work this AM- 39 miles in 19 degree weather- and it ran pretty well, and having some heat was nice. Once I do the water pump, hoses, and thermostat over the holidays- I should have full heat! All those parts are sitting in my office, along with new spark plugs, plug wires, a distributor, pcv valve, and ford racing Valve Covers. I bought a complete top end gasket set- not knowing how much I will do- I wanted all the gaskets just in case.

 
OP
OP
C

CJGamer

New member
Joined
Nov 18, 2010
Messages
46
Reaction score
1
not yet.

I did pull out my grease gun though.

I am planning to do that when I also get the Diff Fluid, diff cover gasket etc. Figured I'd be under there at that time.

I have yet to look at that, and honestly don't know if their are different diff's in each model or what. So that is on my list.

So how do you know what rear axle you have?

If I read right- the diff cover is a Ford 8.8 generally perhaps? I don't see any markings on mine that tell me.

but the axles is that the same listing I assume- 8.8 axles if that's the one you have? I'm new to that stuff obviously.


AdamDude04

New member
Joined
Jan 13, 2009
Messages
828
Reaction score
0
I have a 8.8. If I remember correctly a good way to tell is how many bolts. Iirc, there are 10. A 9 has 12?

 
OP
OP
C

CJGamer

New member
Joined
Nov 18, 2010
Messages
46
Reaction score
1
so I ordered a new rear dist. cover and gasket. I do have the Ford 8.8, thanks.

Also ordered a set of Flowmaster shorty heads in black.

I'll grab the rear oil this week, and do all that along with the greasing of the drivetrain spots needed.....

Do those grease cartridges for grease guns go bad? The ones I have have been sitting unopened in my garage for like 5 years?

Should I grab new, or will they be fine, any thoughts?

Oh- also I was thinking since I hate the fact that the mirrors are chrome- and they have bits of rust- what do you think about sandpapering them really hard, and painting them with the TruckBed Black? I bet that would look cool.

 
Last edited by a moderator:
OP
OP
C

CJGamer

New member
Joined
Nov 18, 2010
Messages
46
Reaction score
1
thought I'd throw up an update of where I am.

Christmas weekend I pulled her into the garage, and started taking the drivers side of the engine top apart. I pulled off the air intake, and removed the valve cover. Next, I pulled off the spark plug wires (marking them first) and replaced the plugs. Everything looked ok under the valve cover, scraped off the gasket bits, including where it was obviously leaking. Put new gasket onto the new cover (blue permatex) and slapped that bad boy on.

Whoops- the stock bolts are no longer long enough. Trip to autozone- got 3/4 inch bolts to replace the 1/2 inch ones (i thin), and it bolt on perfectly.

next up was pulling off the stock exhaust header- to be replaced with a flowtech shorty header- in black. Let me just say this was a total bitch. PB Blaster, Torch, drill, ball been hammer, you name it- I used it. 4 hours later- I was sawing off the bolts on the bottom side to the exhaust pipe with a sawzall and a dremel. But I got it done. Mounted the new header, and that side looks great. I put the plug wires on just as they were.

Now- finally got back to working this weekend. I have a K & N cold air intake, and thermostat up next to do. I also have a water pump- but not sure I want to change it yet. I pull out the air box, mount the mounting bracket for the CAI, and then start on the thermostat. Pulled the fan off ( I intend to paint it a nice black), and pulled off the drive belt. Next up, the simple task of replacing the thermostat. Keep in mind- I did the thermostat on my Mini Cooper a few months ago- it toook about 20 minutes. What I surprise I was in for.

Lookseethere- I can only get one bolt off. Guess I have to take off the water pump......hmmm, guess I need to take off the AC compressor. I searched these boards, and started laughing at everyone ******** about this- plus other boards. What horrible engineering.

Well, the good news is the first 6 bolts for the water pump came off fine. Bolt number 7 broke off. I drilled it out, only took about 5 minutes.

Pulled the thermostat, and housing- soaked the housing in carb cleaner for a while, then scrubbed it up, cleaned it, dryed it, and replaced the thermostat, then the water pump.

Left the ac compressor where it was- bungied to the side for the time being. I already have all new hoses at home- but after pulling the hoses, I decided to get all new hose clips.

Also- I changed the spark plugs on the passenger side this weekend, and put in the new plug wires. Then- I took a look at how the wires were, and discovered that 4 of them were correct- the other 4, in 2 pairs, were reversed. I switched them.

So- next up is to put in new plug wire mounting brackets to keep the wires apart, remount the stuff in front of the water pump, and do the cold air intake. Then- I have the passenger side header, and the passenger side valve cover- which to do, I need to take off the intake manifold. I have all the gaskets for that already- so I mine as well get to it! Getting into the passenger side exhaust header is going to be a total Pain in the Ass, but I guess it is what it is.


Members online

No members online now.

Latest posts

Forum statistics

Threads
22,535
Messages
136,087
Members
25,136
Latest member
Gryph
Top