I hope this doesn't break the website because this is going to include a ton of photos.
That said, here's a little history of this project:
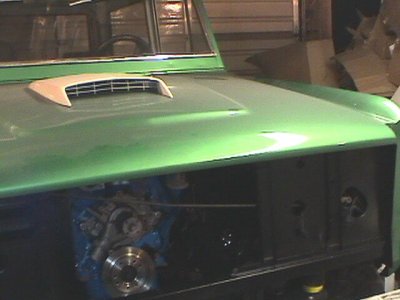
I purchased the Bronco in 2003 and did some rust repairs to the floor, rocker panels and inner fender aprons followed by some major mechanical upgrades. It already had the fiberglass front fenders and Mustang hood scoop when I got it.
When I bought the Bronco it also had a 302 with a 4-barrel carb, solid lifter cam and long tubes headers with Flowmaster 40 series mufflers. It still had the original 3-speed trans but had been converted it to a floor shift. It also had a 5 1/2" suspension lift and 2" body lift with the same Wild Country 35" radials that are on it today. It sat so high that it would barely slide under a 7-foot high garage door! It also had a Dana 44 front axle with disc brakes and a 9" Ford rear axle with a Detroit Locker differential and those are also still present. It also has front and rear axle trusses and anti-sway bars as well as a quassy four link on the rear axle. I say "quassy" because it has upper and lower link bars but still uses the leaf springs. Old school and stiff as ****.
Unfortunately, I soon discovered that the cam in the 302 had a wiped out lobe which I assume was due to a previous owner not using a zinc additive in the oil. When I pulled the oil pan and looked at the crank journals it was obvious that metal from the cam had scarred the crank. So, I had to decide if it was worth rebuilding or if I should just replace the engine. I decided to replace it. More on that later...
I was also not happy with the height and ride quality. I decided to remove the 5 1/2" Rough Country snow plow front springs and replace those with 3 1/2" progressive rate springs from Duff's and I also removed the 2" lift blocks from the rear springs. Then I replaced the Rough Country shocks with remote reservoir Bilsteins, four on the front and two on the rear. That was pretty much it for the suspension changes.
Next up was the transmission. The old 3-speed just wasn't going to cut it with the engine I had in mind. After much research I decided to go with an NV3550 which has a 4:1 first gear ratio and overdrive fifth. The torque rating is a bit suspect but it is a very smooth shifting trans and the gear ratios work well. This transmission was built in the old joint effort New Venture manual trans plant operated by GM and Chrysler. It was used in half ton Chevy and Dodge pickups and most recently the Jeep Wrangler Rubicon. The trans was a new, unused unit.
The transfer case is the original Dana 20 with its 2:1 low range. While rebuilding it I decided to add a Duff's twin stick conversion. I used Advance Adapters plates between the Ford bellhousing and the NV3550 as well as between the NV3550 and the T-case.
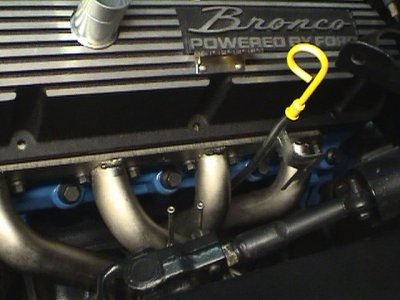
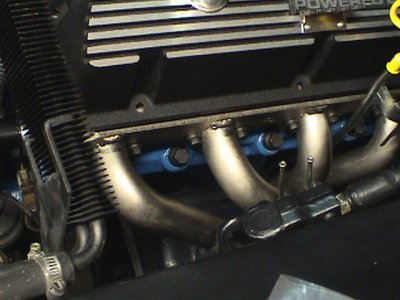
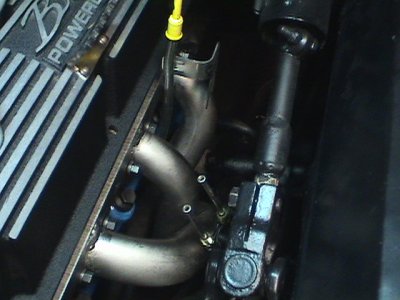
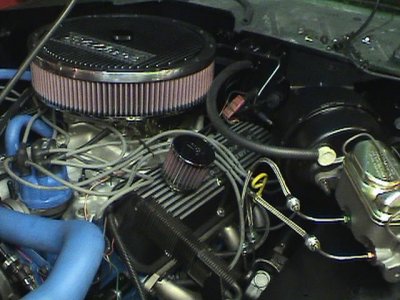
Back to the engine. After a lot of searching I finally found a slightly used 393W shortblock that had been built by Fox Lake in Wooster, OH. It started life as a 351W block and had been balanced and blueprinted with a **** cast steel stroker crank, Eagle I-beam rods and JE/SRP flat top pistons. It also had a radical solid roller camshaft and TFS aluminum cylinder heads. The guy who originally had it built by Fox Lake had it in a Mustang drag car. I said "slightly used" because he had never fired the engine. I bought it without the TFS heads and replaced the cam with a non-roller hydraulic lifter Comp Cams Xtreme Energy cam p/n 35-242-3 (224/240 duration @ .050, .510/.512 lift & 110 deg lobe separation). I also used Crane 1.6 roller rockers, Sig Erson push rods, World Products Roush 200 iron cylinder heads (64cc, 2.02/1.60 valves) that yield an approx 10.5:1 compression ratio, Edelbrock Performer RPM intake, Holley 750 CFM carb, JBG (L&L) long tube headers, Motorcraft AF-42 spark plugs, and a stock 351W distributor with Pertronix electronic conversion kit. I also used a set of Goodyear Hi-Miler radiator and heater hoses made for a late 90's F-150 with a 351W.
I replaced the old, worn out steering box with a quicker ratio box from Tom's Bronco Parts along with a Saginaw power steering pump. Next up was a 24 gallon fuel tank from BC Broncos and a used set of black leather seats from a mid 80's Dodge Daytona. The Bronco already had a steering column mounted Autometer tachometer as well as under-dash water temp and oil pressure gauges, also from Autometer.
All of the above was done by about 2008.
I also purchased a pair of fiberglass quarter panels from KAL Off-Road Racing and an STC soft top. That was in 2009 and, unfortunately, none of that stuff got installed and that's how it sat until the fall of 2020. Other vehicle projects, retirement, moving to another state, new property improvement projects and life in general just got in the way.
Fast forward to 2020 and the first full year of the never-ending pandemic and lots of time to ***** no sick puns intended.
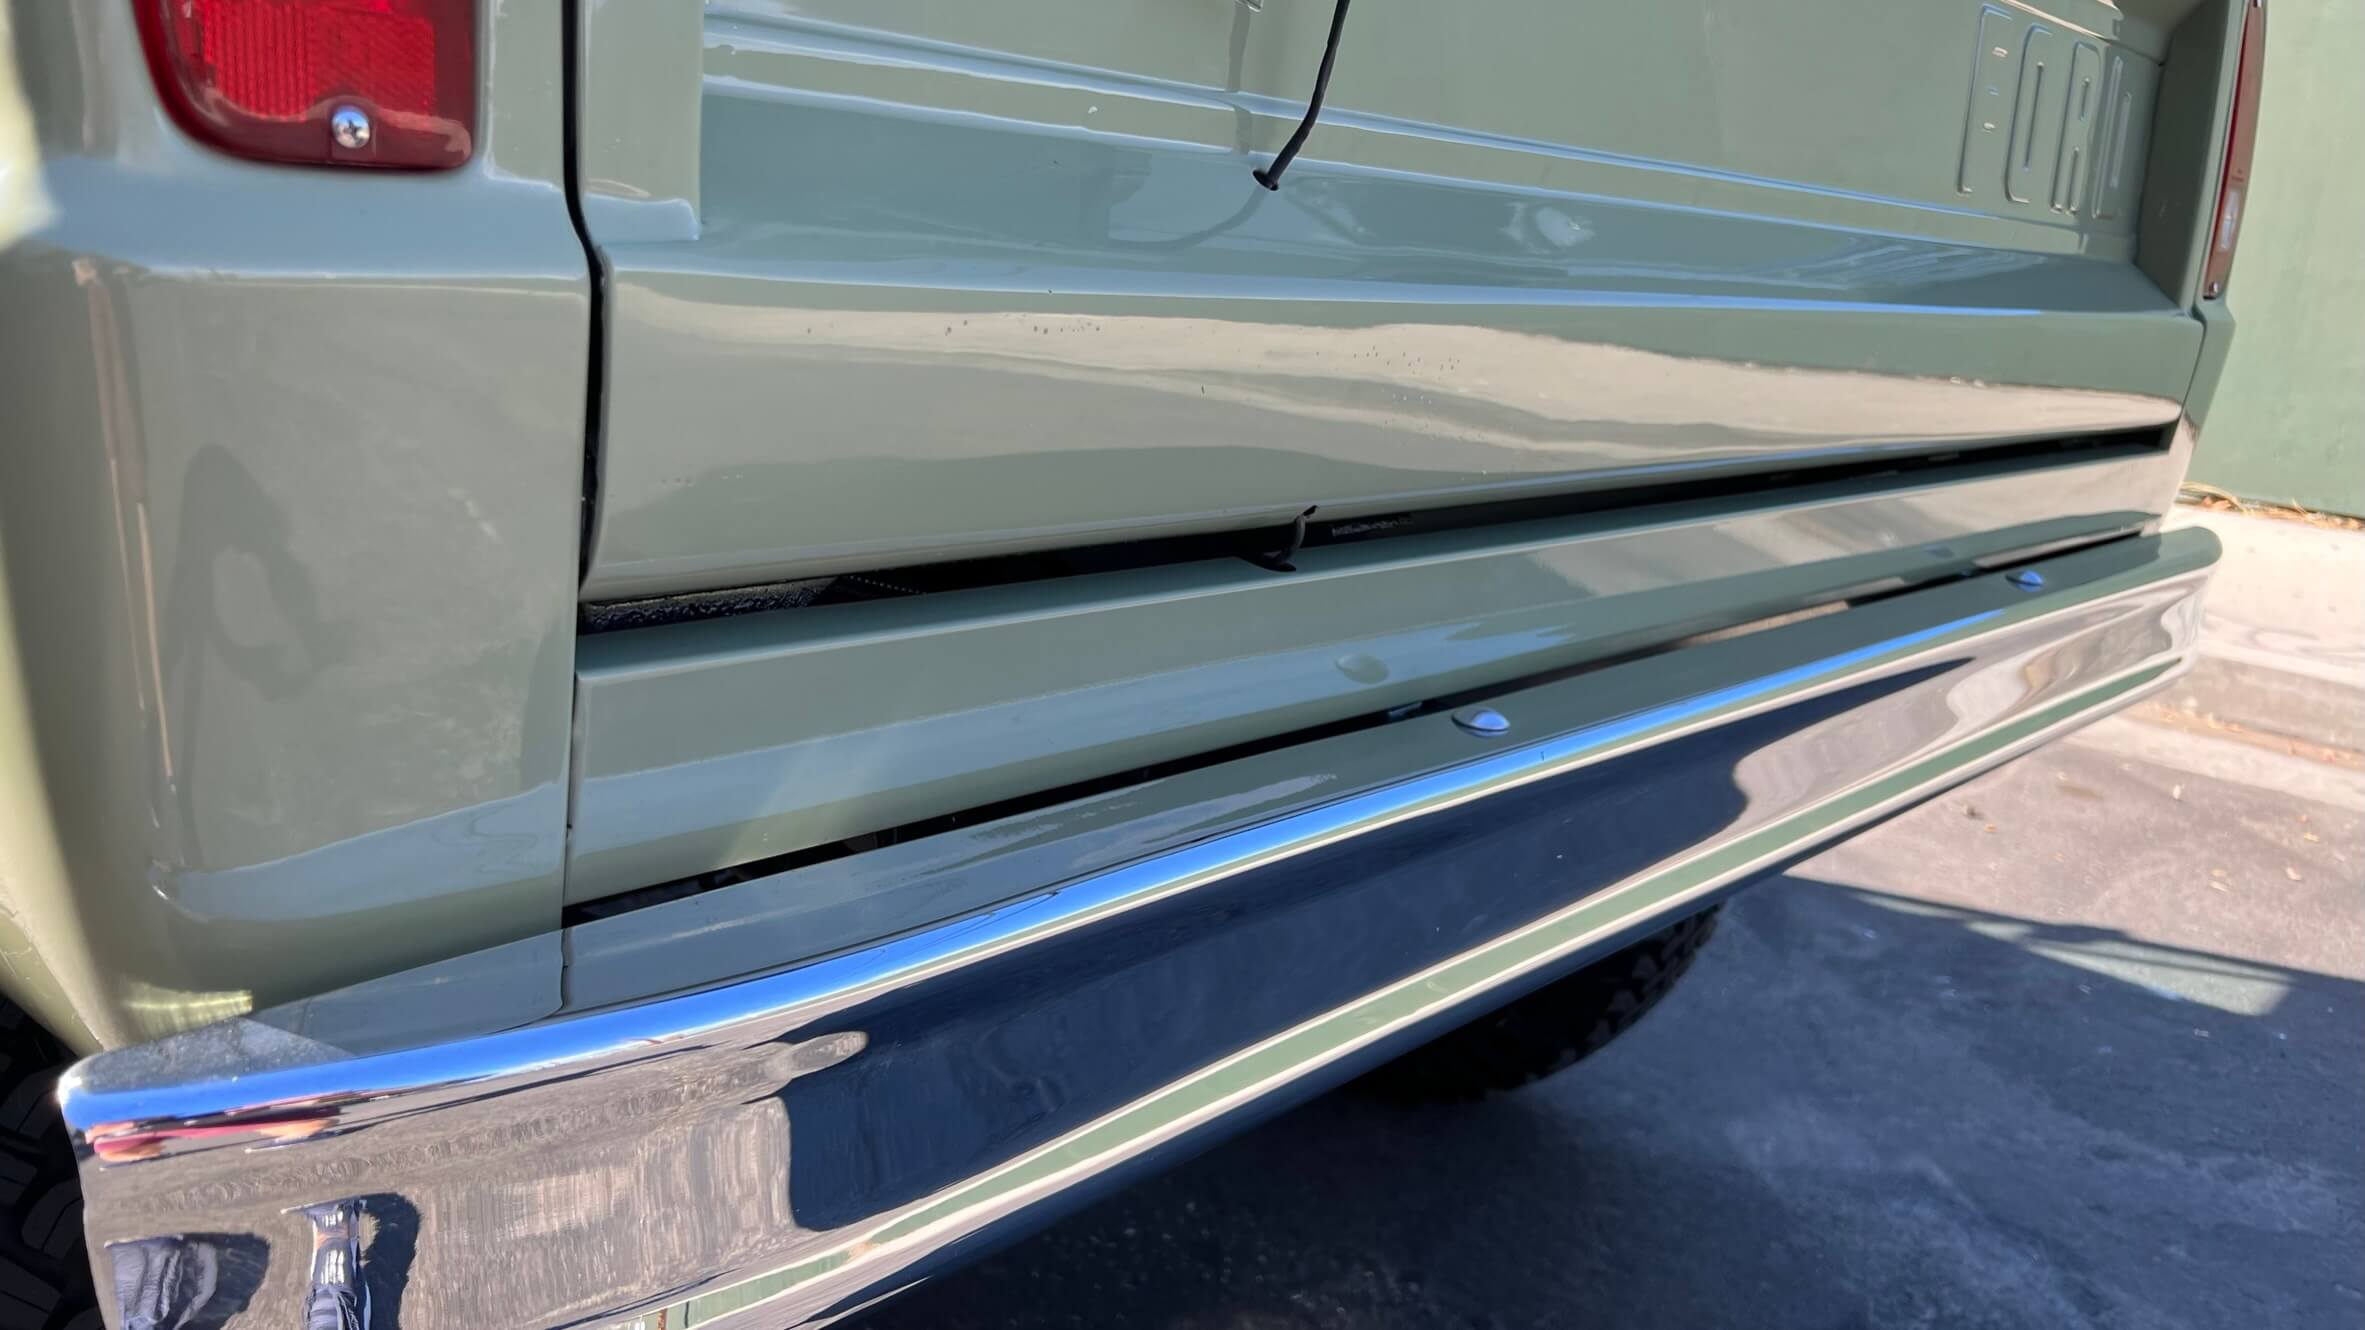
The quarter panels were starting to show the typical rust at the seam weld between the upper and lower panels and the too-thick filler in the passenger door was starting to crack. Whoever painted the Bronco before I got it did a really nice job of spraying it but the prep work left a lot to be desired. I have no idea how long ago that was done but it may have been before new replacement body panels were readily available. They did use new fiberglass front fenders but covered up all the other body damage and rust with body filler. The fiberglass flares on the rear were obviously positioned so they could remove some of the rusted out steel in the wheel openings which resulted in the flares not being centered over the tires. Go figure...
Anyway, the latest changes involved removing as much of the old steel quarters as I could to make room for the one-piece fiberglass quarter panels from KAL without destroying too much of the structural integrity of the body tub. The original rear quarter panels had a horizontal seam between the upper and lower panels. However, the upper panel is one piece with the inner "bed" side which meant that I couldn't completely remove the upper panel. I did slice and dice it though so that I could bend it inward so that the new fiberglass panels could fit over what was left of the old steel pieces. Because the fiberglass quarters included the corners with pockets for the taillights I had to remove nearly all of the corner steel. I basically left only enough steel to support the mounting of the tailgate in the rear and the door posts in the front. The way I mounted them the fiberglass quarter panels can actually be unbolted just like the front fenders. It wouldn't be fun but it can be done. Believe me, I had those things on and off dozens of times during the fitting process which also involved modifying the door and tailgate mounts to re-align those parts with the new quarters.
I had to remove the steel top to install the new quarters so rather than put it back on I replaced it with the STC soft top.
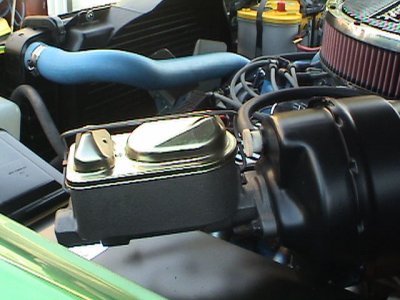
Other recent changes included replacing the passenger side door with another OEM steel door, adding matching Autometer volt and fuel level gauges under the dash, replacing the in-tank swing arm fuel sending unit with a post type unit, adding an Autometer fuel signal adjustment module to correct the fuel gauge, replacing the old radiator with a new 3-row aluminum unit with an electric fan, adding a Barricade brand push bar with LED light bar on the front, adding Mastercraft brand 4-point seat harnesses, and adding a modified original sport (roll) bar. The roll bar mods were mostly to accommodate the addition of the 4-point harnesses as well as add some stiffness.
Pictures to follow. Lots of them.
That said, here's a little history of this project:
I purchased the Bronco in 2003 and did some rust repairs to the floor, rocker panels and inner fender aprons followed by some major mechanical upgrades. It already had the fiberglass front fenders and Mustang hood scoop when I got it.
When I bought the Bronco it also had a 302 with a 4-barrel carb, solid lifter cam and long tubes headers with Flowmaster 40 series mufflers. It still had the original 3-speed trans but had been converted it to a floor shift. It also had a 5 1/2" suspension lift and 2" body lift with the same Wild Country 35" radials that are on it today. It sat so high that it would barely slide under a 7-foot high garage door! It also had a Dana 44 front axle with disc brakes and a 9" Ford rear axle with a Detroit Locker differential and those are also still present. It also has front and rear axle trusses and anti-sway bars as well as a quassy four link on the rear axle. I say "quassy" because it has upper and lower link bars but still uses the leaf springs. Old school and stiff as ****.
Unfortunately, I soon discovered that the cam in the 302 had a wiped out lobe which I assume was due to a previous owner not using a zinc additive in the oil. When I pulled the oil pan and looked at the crank journals it was obvious that metal from the cam had scarred the crank. So, I had to decide if it was worth rebuilding or if I should just replace the engine. I decided to replace it. More on that later...
I was also not happy with the height and ride quality. I decided to remove the 5 1/2" Rough Country snow plow front springs and replace those with 3 1/2" progressive rate springs from Duff's and I also removed the 2" lift blocks from the rear springs. Then I replaced the Rough Country shocks with remote reservoir Bilsteins, four on the front and two on the rear. That was pretty much it for the suspension changes.
Next up was the transmission. The old 3-speed just wasn't going to cut it with the engine I had in mind. After much research I decided to go with an NV3550 which has a 4:1 first gear ratio and overdrive fifth. The torque rating is a bit suspect but it is a very smooth shifting trans and the gear ratios work well. This transmission was built in the old joint effort New Venture manual trans plant operated by GM and Chrysler. It was used in half ton Chevy and Dodge pickups and most recently the Jeep Wrangler Rubicon. The trans was a new, unused unit.
The transfer case is the original Dana 20 with its 2:1 low range. While rebuilding it I decided to add a Duff's twin stick conversion. I used Advance Adapters plates between the Ford bellhousing and the NV3550 as well as between the NV3550 and the T-case.
Back to the engine. After a lot of searching I finally found a slightly used 393W shortblock that had been built by Fox Lake in Wooster, OH. It started life as a 351W block and had been balanced and blueprinted with a **** cast steel stroker crank, Eagle I-beam rods and JE/SRP flat top pistons. It also had a radical solid roller camshaft and TFS aluminum cylinder heads. The guy who originally had it built by Fox Lake had it in a Mustang drag car. I said "slightly used" because he had never fired the engine. I bought it without the TFS heads and replaced the cam with a non-roller hydraulic lifter Comp Cams Xtreme Energy cam p/n 35-242-3 (224/240 duration @ .050, .510/.512 lift & 110 deg lobe separation). I also used Crane 1.6 roller rockers, Sig Erson push rods, World Products Roush 200 iron cylinder heads (64cc, 2.02/1.60 valves) that yield an approx 10.5:1 compression ratio, Edelbrock Performer RPM intake, Holley 750 CFM carb, JBG (L&L) long tube headers, Motorcraft AF-42 spark plugs, and a stock 351W distributor with Pertronix electronic conversion kit. I also used a set of Goodyear Hi-Miler radiator and heater hoses made for a late 90's F-150 with a 351W.
I replaced the old, worn out steering box with a quicker ratio box from Tom's Bronco Parts along with a Saginaw power steering pump. Next up was a 24 gallon fuel tank from BC Broncos and a used set of black leather seats from a mid 80's Dodge Daytona. The Bronco already had a steering column mounted Autometer tachometer as well as under-dash water temp and oil pressure gauges, also from Autometer.
All of the above was done by about 2008.
I also purchased a pair of fiberglass quarter panels from KAL Off-Road Racing and an STC soft top. That was in 2009 and, unfortunately, none of that stuff got installed and that's how it sat until the fall of 2020. Other vehicle projects, retirement, moving to another state, new property improvement projects and life in general just got in the way.
Fast forward to 2020 and the first full year of the never-ending pandemic and lots of time to ***** no sick puns intended.
The quarter panels were starting to show the typical rust at the seam weld between the upper and lower panels and the too-thick filler in the passenger door was starting to crack. Whoever painted the Bronco before I got it did a really nice job of spraying it but the prep work left a lot to be desired. I have no idea how long ago that was done but it may have been before new replacement body panels were readily available. They did use new fiberglass front fenders but covered up all the other body damage and rust with body filler. The fiberglass flares on the rear were obviously positioned so they could remove some of the rusted out steel in the wheel openings which resulted in the flares not being centered over the tires. Go figure...
Anyway, the latest changes involved removing as much of the old steel quarters as I could to make room for the one-piece fiberglass quarter panels from KAL without destroying too much of the structural integrity of the body tub. The original rear quarter panels had a horizontal seam between the upper and lower panels. However, the upper panel is one piece with the inner "bed" side which meant that I couldn't completely remove the upper panel. I did slice and dice it though so that I could bend it inward so that the new fiberglass panels could fit over what was left of the old steel pieces. Because the fiberglass quarters included the corners with pockets for the taillights I had to remove nearly all of the corner steel. I basically left only enough steel to support the mounting of the tailgate in the rear and the door posts in the front. The way I mounted them the fiberglass quarter panels can actually be unbolted just like the front fenders. It wouldn't be fun but it can be done. Believe me, I had those things on and off dozens of times during the fitting process which also involved modifying the door and tailgate mounts to re-align those parts with the new quarters.
I had to remove the steel top to install the new quarters so rather than put it back on I replaced it with the STC soft top.
Other recent changes included replacing the passenger side door with another OEM steel door, adding matching Autometer volt and fuel level gauges under the dash, replacing the in-tank swing arm fuel sending unit with a post type unit, adding an Autometer fuel signal adjustment module to correct the fuel gauge, replacing the old radiator with a new 3-row aluminum unit with an electric fan, adding a Barricade brand push bar with LED light bar on the front, adding Mastercraft brand 4-point seat harnesses, and adding a modified original sport (roll) bar. The roll bar mods were mostly to accommodate the addition of the 4-point harnesses as well as add some stiffness.
Pictures to follow. Lots of them.
Last edited: