88 Bronco 5.0 surges when RPMs go over 2000

Disclaimer: Links on this page pointing to Amazon, eBay and other sites may include affiliate code. If you click them and make a purchase, we may earn a small commission.

miesk5

96 Bronco 5.0
Staff member
Moderator
Joined
Oct 18, 2005
Messages
9,071
Reaction score
1,018
Location
Floating in the Pacific
Yo Jb,
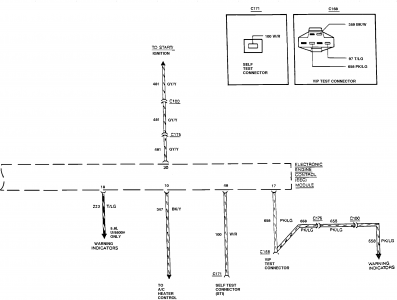
Inspect EEC IV Pins #30, #17, #48 for proper connections, bent or broken pins, corrosion, loose wires, and proper routing.
eec04.gif

Here are some PCM KILLER perpetrators and other causes:
Smell around the PCM. If it smells like dead fish, it's bad.
Look for PCM printed circuit board burn marks around leaking capacitors, resistors.
For example, see Old leaky capacitors in swapped EEC and no more codes by jowens1126
Water damage from cowl leaks, ESPECIALLY if you you have wet carpet or mat near driver kick panel; or on PCM Connector due to a bad hood seal near cowl panel, viewable with hood up.
Corrosion or damage due to moisture is one of the main reasons for failure. Corrosion can enter through the wiring harness and moisture can enter by a failure in the seals in the PCM itself. This happens over a period of time (5 to 10 years) due to exposure to the elements.
The alternator could be generating an AC voltage spike due to bad diode(s) or supply Voltage Overloads.
I recommend bench-testing the alternator for voltage output and AC voltage ripple.
Thermal stress due to excessive heat and excessive vibration that causes sensitive parts to fail.
Bronco was jump started on reverse polarity.
Connector pin damage or corrosion,

Internal PCM killer perps are;
broken tracks,
cold solder joints,
short circuit,
thermal stress due to excessive heat and excessive vibration that causes sensitive parts to fail,
Overheated PC,.
Bad Intel 8061 chip or bad Intel 8361 memory chip,
Bad Internal Voltage Regulator, see Wayback Machine by Ryan M
 

Attachments

  • download - 2021-04-17T114713.275.png
    download - 2021-04-17T114713.275.png
    18.7 KB · Views: 4
  • download - 2021-04-17T114713.275.png
    download - 2021-04-17T114713.275.png
    18.7 KB · Views: 4
OP
OP
J

Jbford

New member
Joined
Apr 11, 2021
Messages
21
Reaction score
3
Location
Alabama
-Installed new distributor and coil. No change
-Fuse 17 is good
-Pin 17 has 12v with key on
-Pulled the PCM and opened it up
--No unusual smells
--No damaged or bent pins
--No obvious signs of burns or leakage on the circuit board

I'll pull alternator in the next couple days and have it bench tested

Side note: I didn't think it was relevant so I never mentioned before but besides the engine, harness, and PCM I also swapped the entire dash and it's wiring harness. I mention it now because I just noticed today that the blower motor is not working and it was before. I pulled the dash unit out and verified good ground on the plug going to the switch but no power. Again, I don't see how this can be related but thought I'd throw it out there just in case.
 

miesk5

96 Bronco 5.0
Staff member
Moderator
Joined
Oct 18, 2005
Messages
9,071
Reaction score
1,018
Location
Floating in the Pacific
OP
OP
J

Jbford

New member
Joined
Apr 11, 2021
Messages
21
Reaction score
3
Location
Alabama
Thanks miesk5.

One of the other originally listed problems from when I started this thread hasn't been addressed yet and although I'm not sure, I feel like it's related. And that's the fuel pressure. It stays around 30-32 with KOEO, at idle, and when accelerating. I've replaced the High-pressure pump, filter, and FPR but it still stays at 30-32 and it holds that pressure for quite a while.
 

miesk5

96 Bronco 5.0
Staff member
Moderator
Joined
Oct 18, 2005
Messages
9,071
Reaction score
1,018
Location
Floating in the Pacific
Yo,
KOEO Should be higher 34-45
check vacuum line and return line
 

Attachments

  • Screenshot_20210418-165158_Adobe Acrobat.jpg
    Screenshot_20210418-165158_Adobe Acrobat.jpg
    428.9 KB · Views: 3

miesk5

96 Bronco 5.0
Staff member
Moderator
Joined
Oct 18, 2005
Messages
9,071
Reaction score
1,018
Location
Floating in the Pacific
Yo,
Single-Function Reservoir in 84-89;
download - 2021-04-18T172503.647.png
download - 2021-04-18T172236.475.png
"FUEL RESERVOIR
An in-line reservoir has been included in the fuel system. Under normal operating conditions, valving in the in-line reservoir allows the high-pressure pump and engine to be supplied with fuel directly from the tank while return flow is routed directly back to the tank. When the pick-up tube is exposed to air, the high pressure pump draws fuel from the reservoir. When the pick-up is again submerged, normal operation resumes.
There are two types of reservoirs single function and dual function. A single function reservoir is used with single tank vehicles. The dual function reservoir is used with dual tank vehicles. A dual function reservoir combines the function of the reservoir with the function of a mechanically actuated selector valve.
"...were only used on the early EFIs; carbs & diesels used electrically-operated tank-select valves, and later EFIs use an in-tank fuel delivery module (FDM) that performs these functions. The single-function reservoir (SFR) is used on vehicles with ONE gas tank, like Broncos, vans, & low-trim pickups. The reservoir is always inside the L frame rail beneath the driver's floorpan about 10" behind the frame fuel pump. The 10mm bolt heads are easy to access on the outer face of the frame rail, but some vehicles have a large heat shield that must also be removed...There's not much to the SFR (which is what ALL Broncos of those years have): the '88 version just has the cup & 1 check valve (earlier versions have 2), but it's almost foolproof. Its (meager) function is described in the caption of the 2nd pic..."
Single-Function Reservoir Testing in 88-89; "...Used on '88-89 Broncos & F-series/E-series/Rangers/others with single tank dual-pump EFI. In this version, the only moving part is the tank-side inlet check valve. The return ports flow freely and are NOT connected to the reservoir. The engine-side supply port is open to the reservoir. To test it, unplug the frame fuel pump, disconnect the engine-side supply (large) line, and cycle the key. If fuel flows out of the reservoir ******, the reservoir is working normally. If not, disconnect the tank-side supply (large) line, and cycle the key. If fuel flows out of the line, the reservoir check valve is probably stuck, or its internal filter is clogged. A reservoir marked "DO NOT REMOVE CUP" does not contain a filter. For a replacement O-ring for the cup, buy a NAPA 3268 (or equivalent) filter..."
 
OP
OP
J

Jbford

New member
Joined
Apr 11, 2021
Messages
21
Reaction score
3
Location
Alabama
Sorry about not posting my progress over the past few days but life sometimes gets in the way but here's where I'm at:

Turns out my fuel pressure test guage was not working properly. My actual Fuel Pressure was about 10 higher than it was reading. So it's actually at 42 KOEO.

I also fixed the fluctuating idle. It turned out to be the EEC. Popped in a new (refurbished) one and that problem went away.

But now I've got a rough idle and "ZERO" power when I put it in drive or reverse.

I really wish I could figure out why I can't pull codes.
 

BroncoJoe19

Active member
Joined
Dec 26, 2007
Messages
2,092
Reaction score
12
Location
New Jersey
Hi miesk5, glad to see you are still doing your thing! You're the best!

jbford,
Did you/ can you swap in the PCM from the other truck?
 

miesk5

96 Bronco 5.0
Staff member
Moderator
Joined
Oct 18, 2005
Messages
9,071
Reaction score
1,018
Location
Floating in the Pacific
Yo Joe,
Welcome Home!
Hope all is well with you and family Joe!

Best?
No, I tend to guess a lot or,smell-nose-marijuana-cannabis-smelling-aroma-min-678x381-1.jpg
 
OP
OP
J

Jbford

New member
Joined
Apr 11, 2021
Messages
21
Reaction score
3
Location
Alabama
BroncoJoe19, I replaced it with a new one and that fixed the biggest issue. Now I'm working on the rough idle and the no power when in gear.
 

BroncoJoe19

Active member
Joined
Dec 26, 2007
Messages
2,092
Reaction score
12
Location
New Jersey
When you turn the ignition key ON the CEL and other lamps light. Do they then turn off?
If I read your posts correctly, the CEL... NEVER turns off.
I think that you really need to track that down.

Regarding a rough idle, perhaps you have a misfiring cylinder.
Perhaps you have crossed wires, or a case of induction misfire.

I am sure that miesk5 has posted about that in the past.
 

BroncoJoe19

Active member
Joined
Dec 26, 2007
Messages
2,092
Reaction score
12
Location
New Jersey
 
OP
OP
J

Jbford

New member
Joined
Apr 11, 2021
Messages
21
Reaction score
3
Location
Alabama
Thanks miesk5 and BroncoJoe19. I won't have another chance to work on it until Friday but I'll let you know what happens.

BroncoJoe19 you did read that correctly about my CEL. The problem is I wrote it wrong. It should have read that it "never" comes on. When I pulled the cluster I found a break in the printed circuit board between the bulb socket and where the harness plugs in. I repaired that and verified that I have good continuity but still no working CEL. And yes, the bulb is good.
 

BroncoJoe19

Active member
Joined
Dec 26, 2007
Messages
2,092
Reaction score
12
Location
New Jersey
In miesk5's first response to you, he included a link on how to test for codes when the CEL is burnt out. Did you do that?

It can be done with either a volt meter, or a 12V test light. I snipped this from a instructional I wrote a long time ago.
It starts at post #5

OK for the '84-'87 crowd this is how you set up your voltmeter so you can read needle sweeps.

Set the VOM on a DC voltage range to read from 0 to 15 volts


Connect the + positive lead to the + terminal on your battery.

Connect the - negative lead to "Self Test Output" in the diagram.
 
Last edited:
OP
OP
J

Jbford

New member
Joined
Apr 11, 2021
Messages
21
Reaction score
3
Location
Alabama
Okay so here's where I'm at. Once again life got in the way so I finally decided to bite the bullet and I had it towed to a shop that came recommended by another Bronco owner in my area. Turns out the shop owner also has an 81 Bronco of his own.

They fixed the fuel pressure problem and rough idle. But got stuck trying to figure out why the TPS is getting 5v in but only millivolts out. They're thinking it's related to the non-functioning CEL light. Right now it runs (not like it should) and idles at 1400 in park and 900-1000 in gear.

His shop is backed up with work and a recent loss of 2 of his 4 mechanics so I decided to have it towed back to my house and see what I can figure out.

I'm going to start with the CEL in case they're right, but I'm not convinced.

Thoughts..........
 

miesk5

96 Bronco 5.0
Staff member
Moderator
Joined
Oct 18, 2005
Messages
9,071
Reaction score
1,018
Location
Floating in the Pacific
Yo,
Wayback Machine
About this capture

1968 Shelby GT500

No Codes?​

.html
The famous
•Check Battery voltage, must be above 10.5 volts.
•Replace battery if not.
•Check battery connections, corrosion, ground faults, and wiring.
• Fix all wiring.
•Check alternator output, must be between 13.5 and 14.5 volts.
•Replace Alternator if not.
•Any recent voltage irregularities from electrical charging system can cause failures.
•Replace alternator and any damaged circuits, wiring, and components.
•Check fusible links on Starter Solenoid if equipped.
•Check fuses and surge protection diode in under hood Power Distribution Box.
•Replace any fuses, diodes, and links if needed.
•Check EEC relay, must show battery voltage when engaged.
•Replace relay and damaged wiring if not.
•Make sure pin 30 on the computer is hooked up correctly.
•Manual transmission computers need to sense SIG-RTN on pin 30 when in neutral.
•Automatic transmission computers need to sense Ground on pin 30 when in neutral.
•Electronicly controled automatic computers need an operational Manual Lever Position Sensor (MLPS)
•Check aftermarket devices like alarm system connected to engine or computer components.
•Restore engine and computer system to original configuration.
•Check aftermarket computer chips and other plug in controls.
•Any chips or controls that impede basic engine and computer function need to be removed.
•Restore computer and harness to original configuration.
•Disconnect computer and inspect for damaged or pushed out pins, corrosion, loose wires.
•Replace computer if visually damaged, repair any damaged pins in harness.
•Visually inspect the ENTIRE engine and computer wiring harness and connections for corrosion, ground faults, shorts, physical damage, and general condition.
•FIX ANY & ALL PROBLEMS!
•Check Self-Test Input circuit on Pin 48 at computer harness for shorts to ground.
•Replace faulty wiring.
•Remove check engine light bulb and check Self-Test Output circuit for shorts to ground.
•Replace faulty wiring.
•Check Engine Light for damage.
•Replace faulty light bulb.
•Measure resistance between battery negative post and pins 20, 40, and 60 at the computer harness.
•Resistance must be less than 5.0 ohms.
•Replace faulty wiring between computer and battery if not.
•Turn key to ON with engine OFF and computer removed. Measure voltage on pins 1, 37, and 57. Must be above 10.5 volts and within 1.0 volt of each other.
•Replace faulty wiring between computer and battery if not.
•Turn key ON with engine OFF and computer reinstalled. Measure voltage between Pin 26 and 46 (voltage reference and signal return) must be between 4.0-6.0 volts.
•Replace faulty wiring and sensors.
•Measure resistance between Pin 46 and Pins 40 and 60 at the computer harness, must be less than 5.0 ohms.
•If all the wiring and sensors check out, Replace the computer.
Complete list of 2-Digit Self-Test Codes and their definitions.
Complete list of 3-Digit Self-Test Codes and their definitions.
FuelInjectedFord.com, is not affiliated with Ford Motor Company."
 
OP
OP
J

Jbford

New member
Joined
Apr 11, 2021
Messages
21
Reaction score
3
Location
Alabama
So far everything you listed in your last post has checked out okay but I'm not completely sure how to check for "short to ground" as listed in these 2 tests;

-Check Self-Test Input circuit on Pin 48 at computer harness for shorts to ground.
-Remove check engine light bulb and check Self-Test Output circuit for shorts to ground
 

miesk5

96 Bronco 5.0
Staff member
Moderator
Joined
Oct 18, 2005
Messages
9,071
Reaction score
1,018
Location
Floating in the Pacific
Yo J,
Check Self-Test Input circuit on Pin 48 at computer harness for shorts to ground.
Disconnect battery terminals and then EEC (PCM)
Key Off.
Harness connector.
Connect multimeter lead to pin 48
Connect other lead to to a clean ground such as G104 location on Drivers side Fender near firewall next to diagnostic connector
G104.jpg
Resistance should be no greater than 0.2 ohms.


Remove check engine light bulb and check Self-Test Output circuit for shorts to ground
Screenshot_20210605-093617_Chrome.jpg
SAME TESTI G AS ABOVE
 

Members online

Latest posts

Forum statistics

Threads
22,509
Messages
135,879
Members
25,108
Latest member
Utahstroke
Top