RR-Texas
Active member
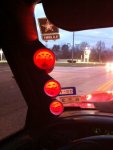
Or you can do it the way I did for $300 and several trips! First we start with the essentials the a-pillar 3-gauges mount and gauges $180 (not Auto Meter gauges) once mounted and all the wiring soldered and such we move to routing, after removing the clutch cover plate as recommended by miesk5 I go to drill the hole. Hey this is metal, not rubber (and where is my 3/4" bit for the temp probe, at work of course with the rest of my $50,000 worth of tools (maybe not that much, heavy truck/bus mechanic and HDs)so off to Lowes buy a $46 step bit, while riding back realize that is crazy, so I head across town to Harbor Freight and buy one for $7, need to check on a bike shoot over that way anyway so 2 birds. Return & drill hole & mount gauges and route wires and such.
Since I have to drain some coolant I might as well replace the stuck thermostat I have had since buying the truck in Oct, and I might as well replace the thermostat bypass hose, which I don't have. And since I have to drain the coolant why not replace the lower radiator that has a cold water leak. "Why yes it has an oil cooler, $35, for a radiator hose and you have to order it as well?! No I do not want the $82 dollar part that goes to the oil cooler too!" Of course the heater hoses are a bit hard, might as well grab them also and a manual shut off valve.
Ok all hoses replaced now let’s connect the gauges, temp gauge pretty straight forward, go to remove the electric oil sender and where is my oil sender socket I have not used since the 90's, that’s right at work in my tool box. Next day return with socket, the oil line is in no way going to reach all the way down front, so back to the auto parts and pick up a oil line kit $7. Make sure the additional fittings will make a union as all of my brass is in a container the other side of Texas or might as well be. Get back go ahead and tighten the feral on the line to the block so I can remove it to install the fitting it screws in to, as I remove it I discover it crimped right at the very end of the line!! Even pulled in a bit, you have got to be kidding me!
Back to the auto parts to purchase another kit or feral as all my brass is somewhere else! Return with another kit secure hose, this time there is 2" sticking through, trim to proper size install and now I have 3 working gauges! So for lots of money, numerous trips and 2 separate overnight delays I have completed the task, sort of …the visor holds the pillar mount in and I still need to attach the gauge light wire. Anybody want me to help them?


