Yo Acvlni,
Welcome!
The transmission issue may be due to lack of maintenance by a previous owner, such as fluid changes, and other scheduled maintenance.
Basically, none are mutually inclusive.
Rear Main Seal;
My pal Trucky wrote about his similar issue, "
Once I got it all back together and started the engine, it was leaking worse that before. I was VERY mad. So I tore it down again with a few ideas as to why it was leaking.
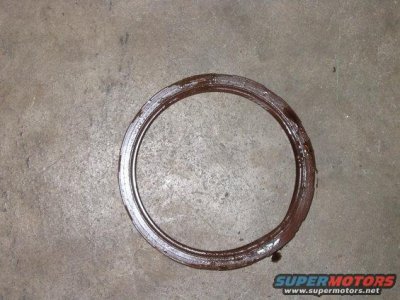
Now for a seal comparison. This is the old seal, nasty and leaky.
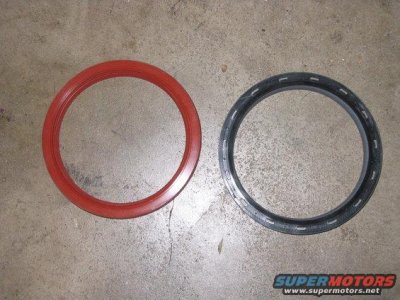
These are both new seals from NAPA (I discovered the NAPA Teflon and the Felpro one from advance are the same damn seal accept the NAPA one is 4 bucks cheaper. On the left is the rubber one and the right is the Teflon, they look about the same, but they ARE NOT.
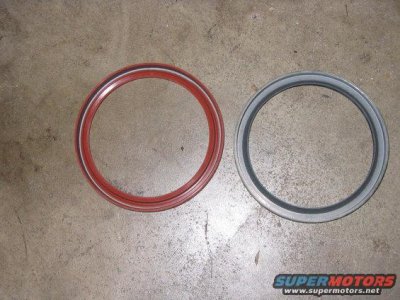
Upon a closer examination I found the rubber one is tensioned to the crank by a spring because the rubber is very pliable, good for repair sleeves since they are slightly bigger than the original crank diameter. The Teflon one is tensioned to the crank by the stiffness of the material not good for repair sleeves should have listened to the directions. Basically what happened was that the Teflon one went on so tight it spun with the crank instead of the crank spinning in it. SO….if you use a repair sleeve DO NOT USE TEFLON. I personally would say the Teflon is better just because of the nature of Teflon, but as I discovered it does not work in all cases. If you use the rubber one put a small film of non-curing silicone on it so it doesn’t start up dry.
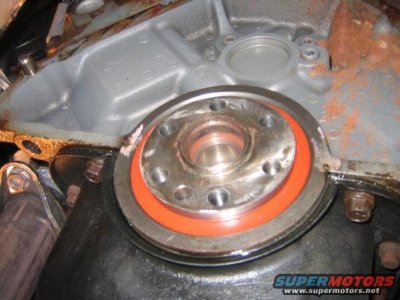
So I did it all over again and put the rubber one on. Went on much easier. After I put it all back together after this go-round, I started it and NO LEAKS! Finally after what seemed like forever it was all good. Now learn from my mistakes!" @
https://www.fullsizebronco.com/forum/23-technical-write-ups/52700-rear-main-seal-change-write-up-what-what-not-do-56k-i-wouldnt.html
Ask mechanic if he saw this; Availability of New Silicone Gasket & Sealant TSB 98-7-4 for 84-96 Bronco; 84-98 Econoline, F-150, F-250 HD, F-250 LD; 84-99 Super Duty F Series, etc. by Ford @
http://www.thedieselstop.com/faq/9497faq/tsb/tsb/files/980704.pdf
●
Slow Cranking:
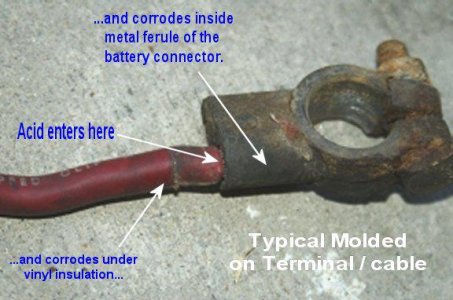
Inspect for loose battery posts, connectors, cables and visible wire strands & under insulation an inch or so under coonectors:
- inspect for corrosion, damage or looseness.
- include ground cables from battery post & connector to engine, frame, intake manifold, hood, etc.;
- and positive cable from battery to relay to starter.
- check starter relay body to inner fender for tightness to a clean, non-rusted/grime -free surface.
- check battery for full charge; Voltage; "...a normal battery that is fully charged produces 12.6 volts, not just 12.0 V.
by El Kabong @
"Cheesy clamp on end. Do not use for a long term repair. Only to get you home when nothing else is available. If you have one of these, suspect it before anything else" El Kabong @ https://www.fullsizebronco.com/forum/21-noobie-bronco-tech-questions-flame-free-zone/165569-common-replies-faqs.html
- use the red and black battery anti-corrosion felt "washers".
Slow Cranking or a Grinding Noise; "... Problems with the negative battery cable is a major cause of starting problems in Ford, Lincoln, and Mercury vehicles. Bad battery cables can cause slow cranking or a grinding noise when trying to start an engine. On some late model vehicles, the wire connection inside the battery terminal connector corrodes easily.
miesk5 note, look for greenish corrosion under insulation neat the connector.
This will cause a voltage drop in the cable and result in low voltage being supplied to the starter. You can check for voltage drop in the cable using a digital voltmeter. Connect the negative probe of the voltmeter to the negative battery post (not the battery terminal connector). Then connect the positive probe to the starter case and crank the engine. The voltage reading should be less than .5 volts. A higher reading means there is resistance in the cable or the battery terminal connector. Clean the cable end and the battery terminal connector and test again. If the voltage reading is still higher than .5 volts, replace the cable and the battery terminal connector..."
Source: by genco1.com
"...Why are the cables and battery so important? The starter circuit pulls a lot of amperage, up to 500 amps depending on the starter, the engine load, and battery condition. This kind of amperage stresses all of the components in the starter circuit, including the battery, battery terminals, the cables including the
ground path. Problems with these components are hard to find because they appear fine at rest or under a light load, but generate high resistance under heavy amperage draws. The result will be low voltage to the starter during cranking, resulting in heavier amperage draw and increased internal heat in the starter. Over time, this will cause starter failure. Voltage measured at the starter during cranking should always be above 9.5VDC..."
Source: by powermastermotorsports
If all passes, pull starter for a free starter no-load test @ local parts store.
"Long crank times may be traced to a sticking Idle Air Control (IAC) valve (TSB 97-9-5, April '97); "...After a 1-4 hour engine soak time, long crank times and/or long crank to start followed by a stall may occur on some vehicles. No further stalling or rough idle will occur after the engine is running. The long crank and/or stall may be due to the Idle Air Control (IAC) Valve sticking. Replace the IAC Valve with a revised IAC Valve if no Diagnostic Trouble Codes (DTCs) are present."
Ford Motorcraft units are best."
Idle Air Control (IAC) Sludge; Poor Idle TSB 91-25-07 for 85-92 Bronco & F Series & many others; "...That is an adjustable idle plate....aka....idle air metering block...aka idle-fixer. You can get it from your Ford dealer. Last one I bought for a customer's truck was about $85 and it came with new mounting screws. made my own (fixed-orfice) plate by cutting a piece of 1/8" flat bar to the shape of my IAC Valve gasket and drilling the passage holes 3/32". I started with 1/16" holes but that weren't quite large enough for my particular engine. Point there is that different engines may require their own orfice size....hence the two adjustments on the Ford (factory) version. These things have been in use for 15 years that I know of, maybe more.....which tells me that Ford has known all along that they had a design glitch in their EFI idle air valve system..."
Source: by DGW1949 at FSB
URL="http://broncozone.com/topic/14269-code-reader/?pid=74587&mode=threaded"]Try a Self Test for Diagnostic Trouble Codes (DTC)s[/URL] by my pal, BroncoJoe19
●
No Crank:
STARTER RELAY GROUND; Check for continuity between relay mounting bracket and clean chassis ground. Rust, grime, paint etc interferes with relay contrul circuit.
Pull red/light blue wire push-on connector off of the inner fender starter relay.
Relay pic in an 89 5.8 by Handy_andy_cv64 (Ed B) at
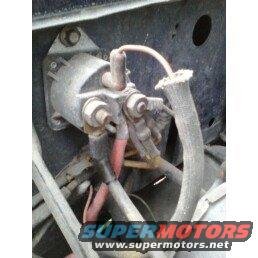
With key in start position, should have batty voltage at red/light blue wire. If not, check for voltage at re/light blue wire on Neutral Safety Switch (also referred to as Back-Up Switch), then at ignition switch.
No voltage there in the "start" mode and you have a problem in the wiring, ignition switch, or neutral safety switch.
With a large screwdriver, jump the two large studs on the starter relay to see if starter cranks over.
When you turn the key to "RUN/START" and there's no spring resistance feeling it usually because the actuator inside steering column is broken or ignition switch is loose.
Overview; "...The ignition rod is attached the upper ignition actuator by a 3/32 x 38 roll pin ($0.12 each) and the rod needs to be straight so it travels enough to trigger the igniton switch but it's a chore to take it off as you need to remove the steering wheel and tear it down to the (Tilt or Non-Tilt) knuckle, usually down when you replace a broken upper ignition actuator. The ignition switch located on the lower part of the steering column has slots so it can be adjusted by loosening the 2 -7/16 nuts and move it up or down but a lot depends on what's wrong up top with some of the other parts, ie: ignition rod, key cylinder, lower igniton actuator and upper igniton actuator. These parts are timed so when you turn the key to RUN they all need to move forward/downward so the rod triggers the igniton switch to START the BKO..."
Accessories that fail to operate with the key in RUN, or that remain on when the key is turned off, may be the result of a misadjusted ignition switch rather than a malfunctioning ignition switch.
Test the ignition system mechanical operation by rotating the ignition switch lock cylinder through all positions of the ignition switch. The movement should feel smooth with no sticking or binding. The ignition system should return from the START position back to the ON position without assistance (spring return). If sticking or binding is encountered, check for the following:
burrs on the ignition switch lock cylinder
binding ignition switch lock cylinder
shroud rubbing against ignition switch lock cylinder
burrs or foreign material around the rack-and-pinion actuator in the housing of the ignition switch lock cylinder
insufficient **** on actuator
binding ignition switch
The ignition switch can be adjusted by loosening the mounting screws, and sliding as described in above link.
A clunk while jumping the starter relay'(on the inner passenger fender liner) two large posts indicates bad starter relay contacts, bad wiring to starter, bad starter, corroded connections or a frozen engine.
Attached Thumbnails
●
Transmission:
Let's identify it first;
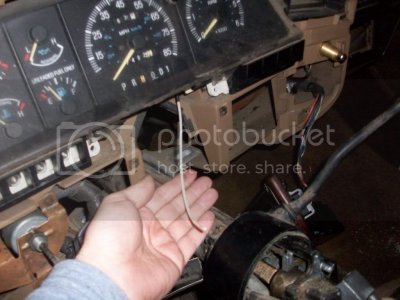
AOD has 14 pan bolts, see pic; P-R-N-(D)-D-1 shifter pattern, note, is actually a (D) - Indicator pic
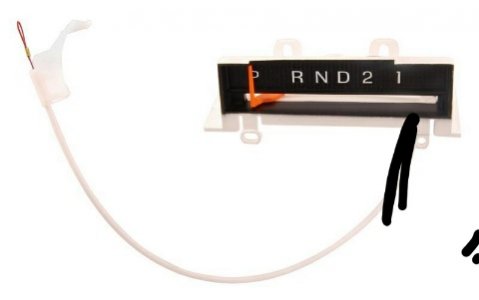
by danheit ▪C6 has 17 pan bolts, P-R-N-D-2-1, shifter pattern - Indicator pic
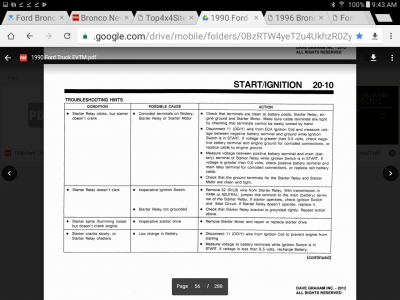
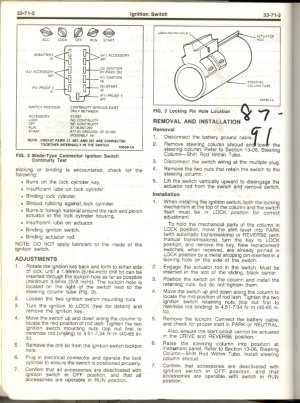
C6 & AOD TROUBLESHOOTING CHARTS ATTACHED
Figures from left to right;
1 & 2 are C6
3 & 4 are AOD
/monthly_03_2017/post-3816-0-59769500-1489503177_thumb.png
/monthly_03_2017/post-3816-0-12302400-1489503194_thumb.png
/monthly_03_2017/post-3816-0-67575300-1489503706_thumb.png
/monthly_03_2017/post-3816-0-35744100-1489503723_thumb.png
●
Overheating with A/C On:
- Damaged water thermostat.
- Damaged water pump.
- Cooling fan inoperative.
- Plugged radiator.
B1 CHECK COOLANT LEVEL
NOTE: If engine is hot, allow engine to cool down before proceeding.
- Remove radiator cap and check coolant level at radiator coolant recovery reservoir.
Is coolant level OK?
Yes
No
GO to
B2.
REFILL as outlined. REFER to
Cooling System, Draining, Filling and Bleedingin the Cleaning and Inspection portion of this section. GO to
Pinpoint Test A.
B2 CHECK COOLANT CONDITION
- Check coolant for contaminants such as rust or corrosion. Also, check for color discoloration.
Is coolant condition OK?
Yes
No
GO to
B3.
FLUSH system. REFER to
Cooling System Flush Procedure in the Cleaning and Inspection portion of this section. RETEST system.
B3 CHECK FOR AIRFLOW OBSTRUCTION
 Visually inspect A/C condenser core and radiator for obstructions, such as leaves or bugs.
Is there any obstruction?
Yes
No
REMOVE obstruction and CLEAN A/C condenser core and radiator in the Cleaning and Inspection portion of this section. RETEST system.
GO to
B4.
B4 CHECK WATER THERMOSTAT OPERATION
- Allow engine to run for 10 minutes.
- Feel the inlet and outlet heater water hose and the underside of the upper radiator hose.
Are the upper radiator hose and heater water hoses cold?
Yes
No
REPLACE water thermostat. REFER to
Thermostat, Water in the Removal and Installation portion of this section. RETEST system.
LEAVE engine RUNNING. GO to
B5.
B5 CHECK COOLING FAN
- Check for proper cooling fan clutch operation. Perform Fan Clutch Test. Refer to Component Tests in this section.
Did cooling fan clutch operate OK?
Yes
No
CHECK the following:
- Rust or scale in radiator
- Water pump shaft and impeller
- Collapsed lower hose
REPLACE fan clutch. REFER to
Cooling Fan Blade and Fan Clutch in the Removal and Installation portion of this section. RETEST system. miesk5 note, this requires a tachometer, and strobe light, a mechanic may have it or a radiator repair shop should.
PINPOINT TEST A : LOSS OF COOLANT
A1 CHECK COOLANT LEVEL
NOTE: If engine is hot, allow engine to cool down before proceeding.
- Check coolant level at radiator coolant recovery reservoir.
Is coolant level OK?
Yes
No
GO to
A2.
REFILL as outlined. GO to
A2.
A2 CHECK FOR VISIBLE LEAKAGE
Engine coolant has an added dye color, that makes the coolant an excellent leak detector.
- Check entire cooling system for visible leakage.
Is there visible leakage?
Yes
No
SERVICE as required. RETEST system.
GO
A3.
A3 PRESSURE TEST COOLING SYSTEM
NOTE: Check inside vehicle for possible heater core leakage.
- Using Rotunda Radiator/Heater Core Pressure Tester 021-00013 or equivalent, pressurize cooling system as outlined in Pressure Test under Component Tests in this section.
Is there leakage?
Yes
No
SERVICE as required.
GO to
A4.
A4 CHECK RADIATOR CAP
- Using Rotunda Radiator/Heater Core Pressure Tester 021-00013 or equivalent, test pressure relief radiator cap. Refer to Radiator Cap Pressure Test in Component Tests in this section.
Did radiator cap test OK?
Yes
No
GO to
A5.
REPLACE damaged pressure relief cap. RETEST system.
A5 CHECK RADIATOR OVERFLOW HOSE
- Remove radiator overflow hose.
- Inspect radiator overflow hose for obstruction, cracks or cuts.
Is radiator overflow hose condition OK?
Yes
No
GO to
A6.
SERVICE hose as required.
A6 CHECK RESERVOIR
- Replenish coolant to Cold level.
- Inspect radiator coolant recovery reservoir for leaks.
Is there leakage at radiator coolant recovery reservoir?
Yes
No
REPLACE coolant recovery reservoir. RESTORE vehicle.
GO to
A7.
A7 CHECK COOLANT FOR INTERNAL LEAKAGE
- Visually inspect coolant in radiator coolant recovery reservoir for signs of transmission or engine oil.
Is oil evident in coolant?
Yes
No
If engine oil is evident on vehicles with an engine oil cooler, REMOVE engine oil cooler and INSPECT for damage. REPLACE if damaged.
If engine oil is evident on vehicles without engine oil cooler or if oil cooler checks out OK, REMOVE cylinder head as outlined in
Section 03-01A,
Section 03-01B,
Section 03-01C, or
Section 03-01D, depending on engine, and INSPECT for leaking head gasket and head or block cracks.
If transmission oil is evident, replace transmission oil cooler in radiator as outlined in this section and check condition of transmission oil as outlined in this section.
GO to
A8.
A8 CHECK ENGINE AND TRANSMISSION FOR COOLANT
- Remove oil level indicator for engine and transmission.
- Carefully inspect oil level indicator for evidence of coolant.
Is coolant evident?
Yes
No
If coolant is in engine oil on vehicles with an engine oil cooler, REMOVE engine oil cooler and INSPECT for damage. REPLACE if damaged.
If coolant is evident in engine oil on vehicles without oil cooler or if oil cooler checks out OK, REMOVE cylinder head as outlined in
Section 03-01A,
Section 03-01B,
Section 03-01C, or
Section 03-01D, depending on engine, and INSPECT for leaking head gasket and head or block cracks.
If coolant is evident in transmission oil, REFER to transmission oil coolant check in
Section 07-01A,
Section 07-01B,
Section 07-01C or
Section 03-01D.
Cooling system is OK.
●
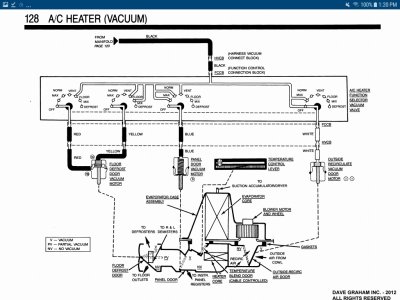
HVAC temp slider:
Temperature Blend Door is cable operated & sends air around (for less heat) or through the heater core ( for more heat) whether A/C is On or Off..
Blend door is "hinged by a piece of flexible plastic, the hinge wears out and breaks then it is not forced into the hot air position by the cable. I found a good one in the junk yard and replaced mine. You have to take most of the dash apart to get to the thing. It takes a while to complete this repair." by JDApollo
or;
Pull "your radio out, you can look at the top of the A/C controls. Sometimes a wire from the radio gets tangled in the mechanism, and it can lock it.

Or, the cables that connect the slides to the blend door can kink or come loose. It's most common for the cable to pop out AT the blend door lever, over the passenger footwell, but that never locks the control." by Steve
"87-91 Temperature Blend Cable It's common for the cable to slip out of the adjuster clip, resulting in no response to the temperature slider. This is the TOP of the box, so the camera is on the passenger side, and the driver is toward the top of the pic.
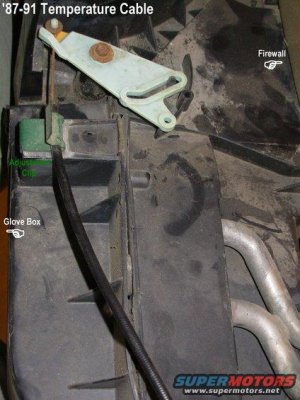
..." by Steve
o
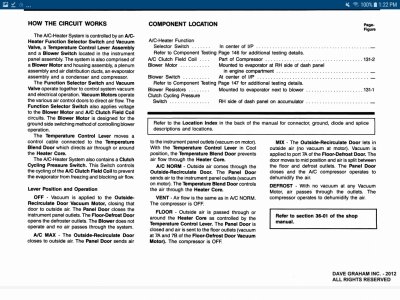
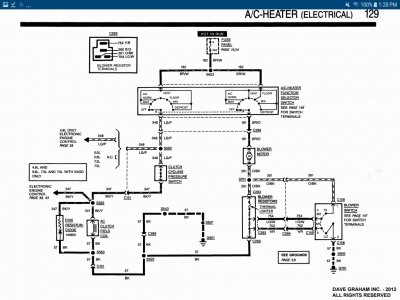
FYI;
●
Speedometer:
When mechanic calibrated it did he change the gear t
o adjust for the 33" tire size?
Gear Change in a 90 (in Xfer Case Tail Housing), similar to 88Source: by Keith L (TTB Blows, Bling-Bling) @ https://www.supermotors.net/clubs/superford/registry/139/13464-2
Gear Change Calculator w/Ford Part Numbers, Colors, & Tooth Countk by Chris B (Blue, bronco boy) at
http://web.archive.org/web/20051128094602/http://www3.bc.sympatico.ca/cbradley/speedogearchange.html
●
Here is the
1988 Bronco Dealer Brochure
GL!
Al


